
Customize a project so it opens the way your team works: a background, a color, a default view, and the fields that you track. The data stays the same when you change the look.
TL;DR: Open Project Settings to set a cover image or a full background on the Appearance tab. Set the Default View on the Settings tab. The link color comes from the workspace or folder. Save a finished design as a template to reuse it. Most options work on every plan. Some backgrounds need a paid plan.
One set of project data feeds every view and custom field. The look changes, the content stays the same.
Customization at a Glance
Find the option, then go to its section.
| You want to change | Where | Plan |
|---|---|---|
| Background or cover image | Project Settings → Appearance | Every plan. Gradients, Artwork, and Upload need a paid plan. |
| Link and accent color | Workspace or folder settings → General → Color | Every plan |
| Default view | Project Settings → Settings → Default View | Every plan. Owner or Admin role only. |
| Fields | The + button in Table view | See Custom Fields |
| Sort and filter | The More menu and the filter bar | Every plan. Some sort options need a paid plan. |
| Who can edit | Share → Share Link → Permissions | Every plan. The Checker role needs a paid plan. |
| Text size | Your phone settings, or zoom on a computer | Every plan. See Change Font Size. |
Set Project Background
A background gives each project its own look, so your team finds it fast.
- In the project header, click
 Project Settings.
 - Open the Appearance tab.
- Pick a tab: Images, Colors, Gradients, Artwork, or Upload.
- Click a background. For a surprise, click Random.
An uploaded image must be at least 800 × 600 pixels, at most 6000 × 4000 pixels, and up to 11 MB.
Display as Background
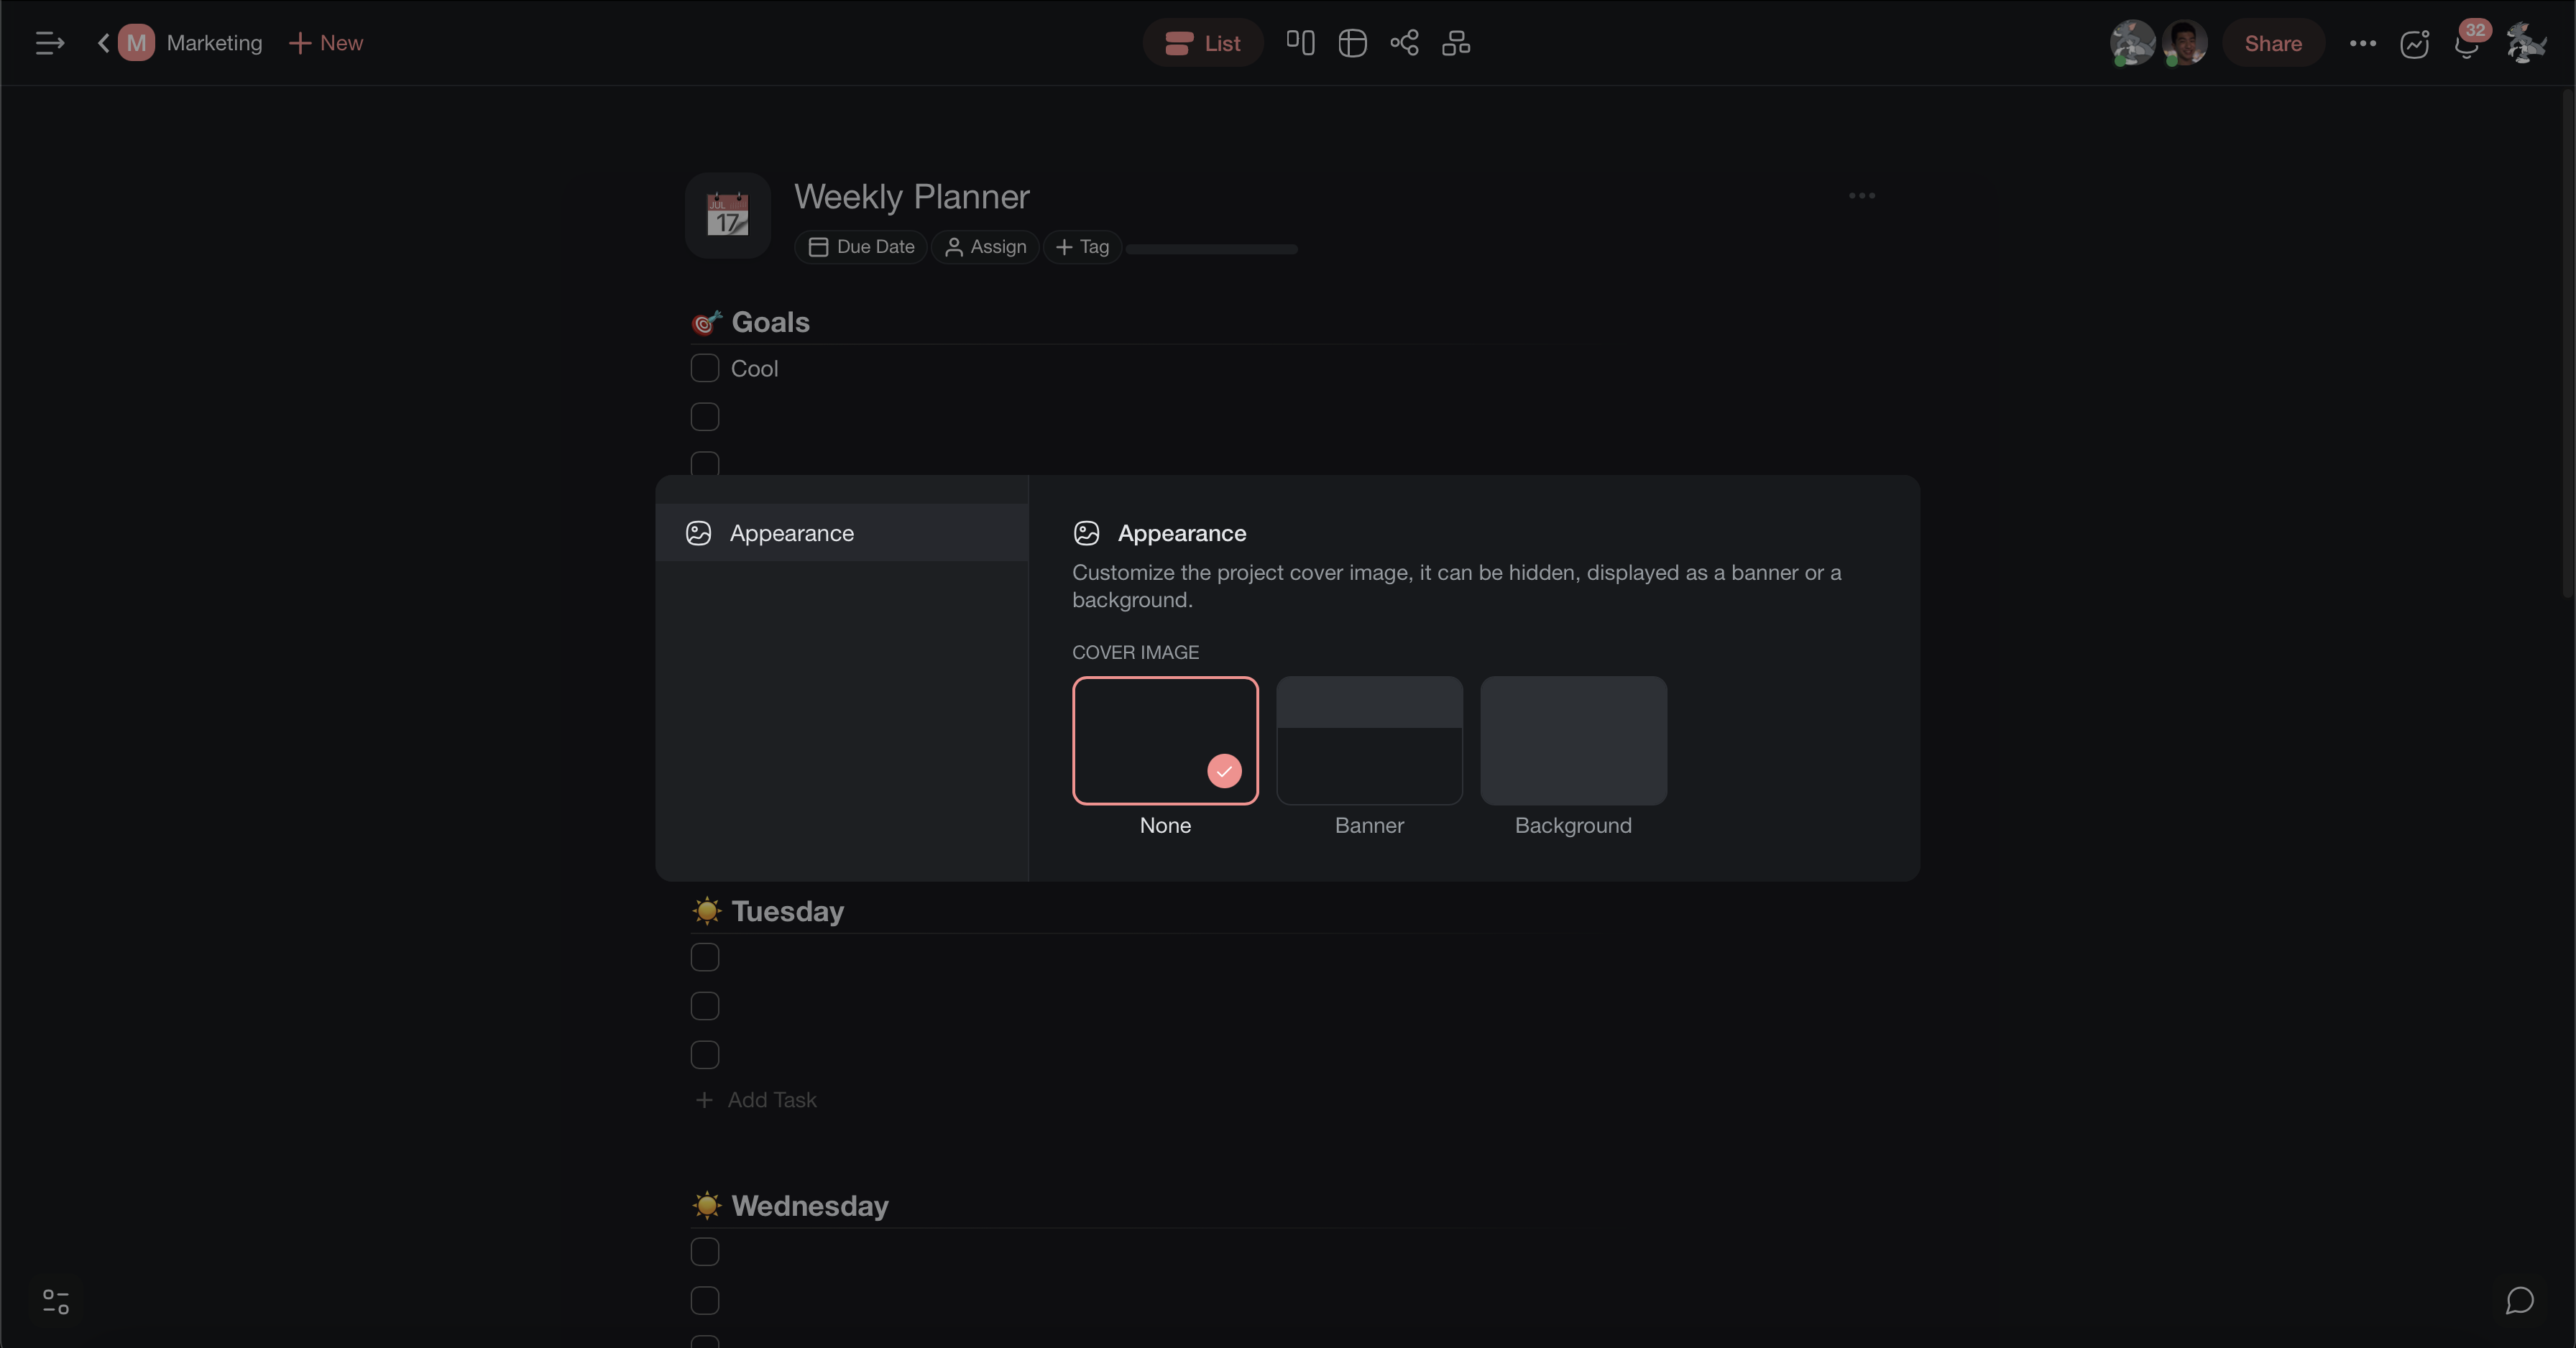
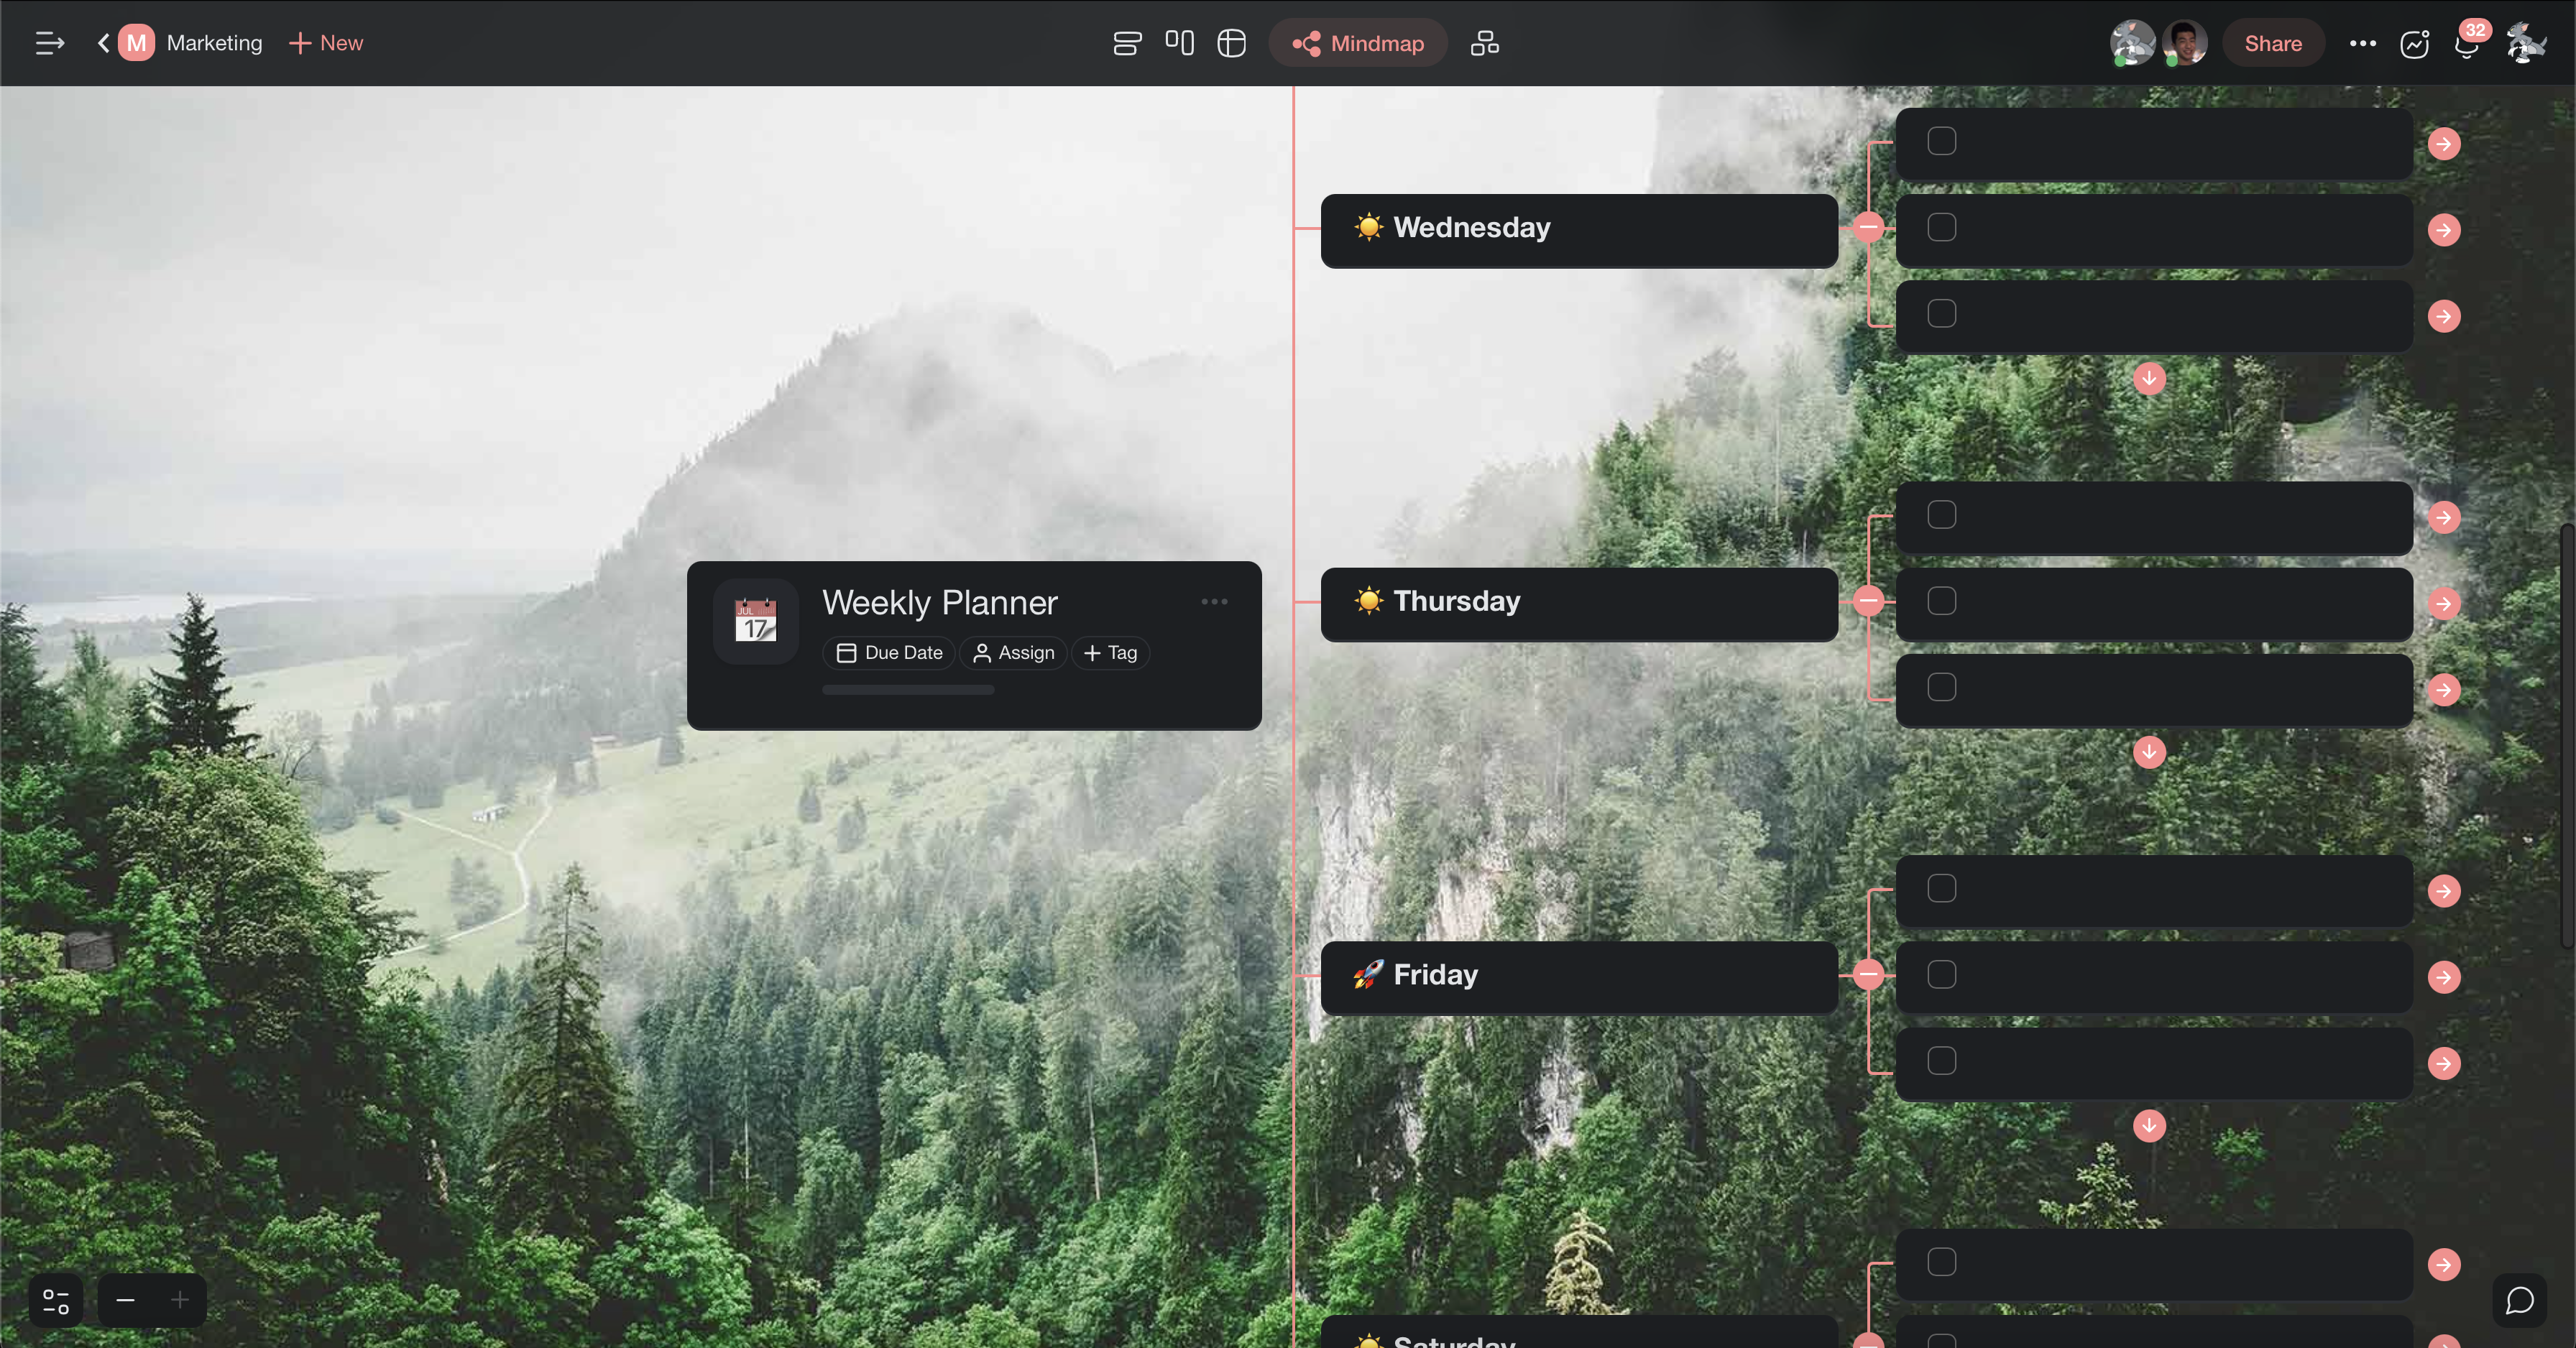
The cover image can show as a banner at the top, or fill the whole screen.
- Open Project Settings → Appearance.
- Under Cover Image, pick None, Banner, or Background.
Test a full background in the Mind Map or Board view. Those views show most of it.
Choose a Color Theme
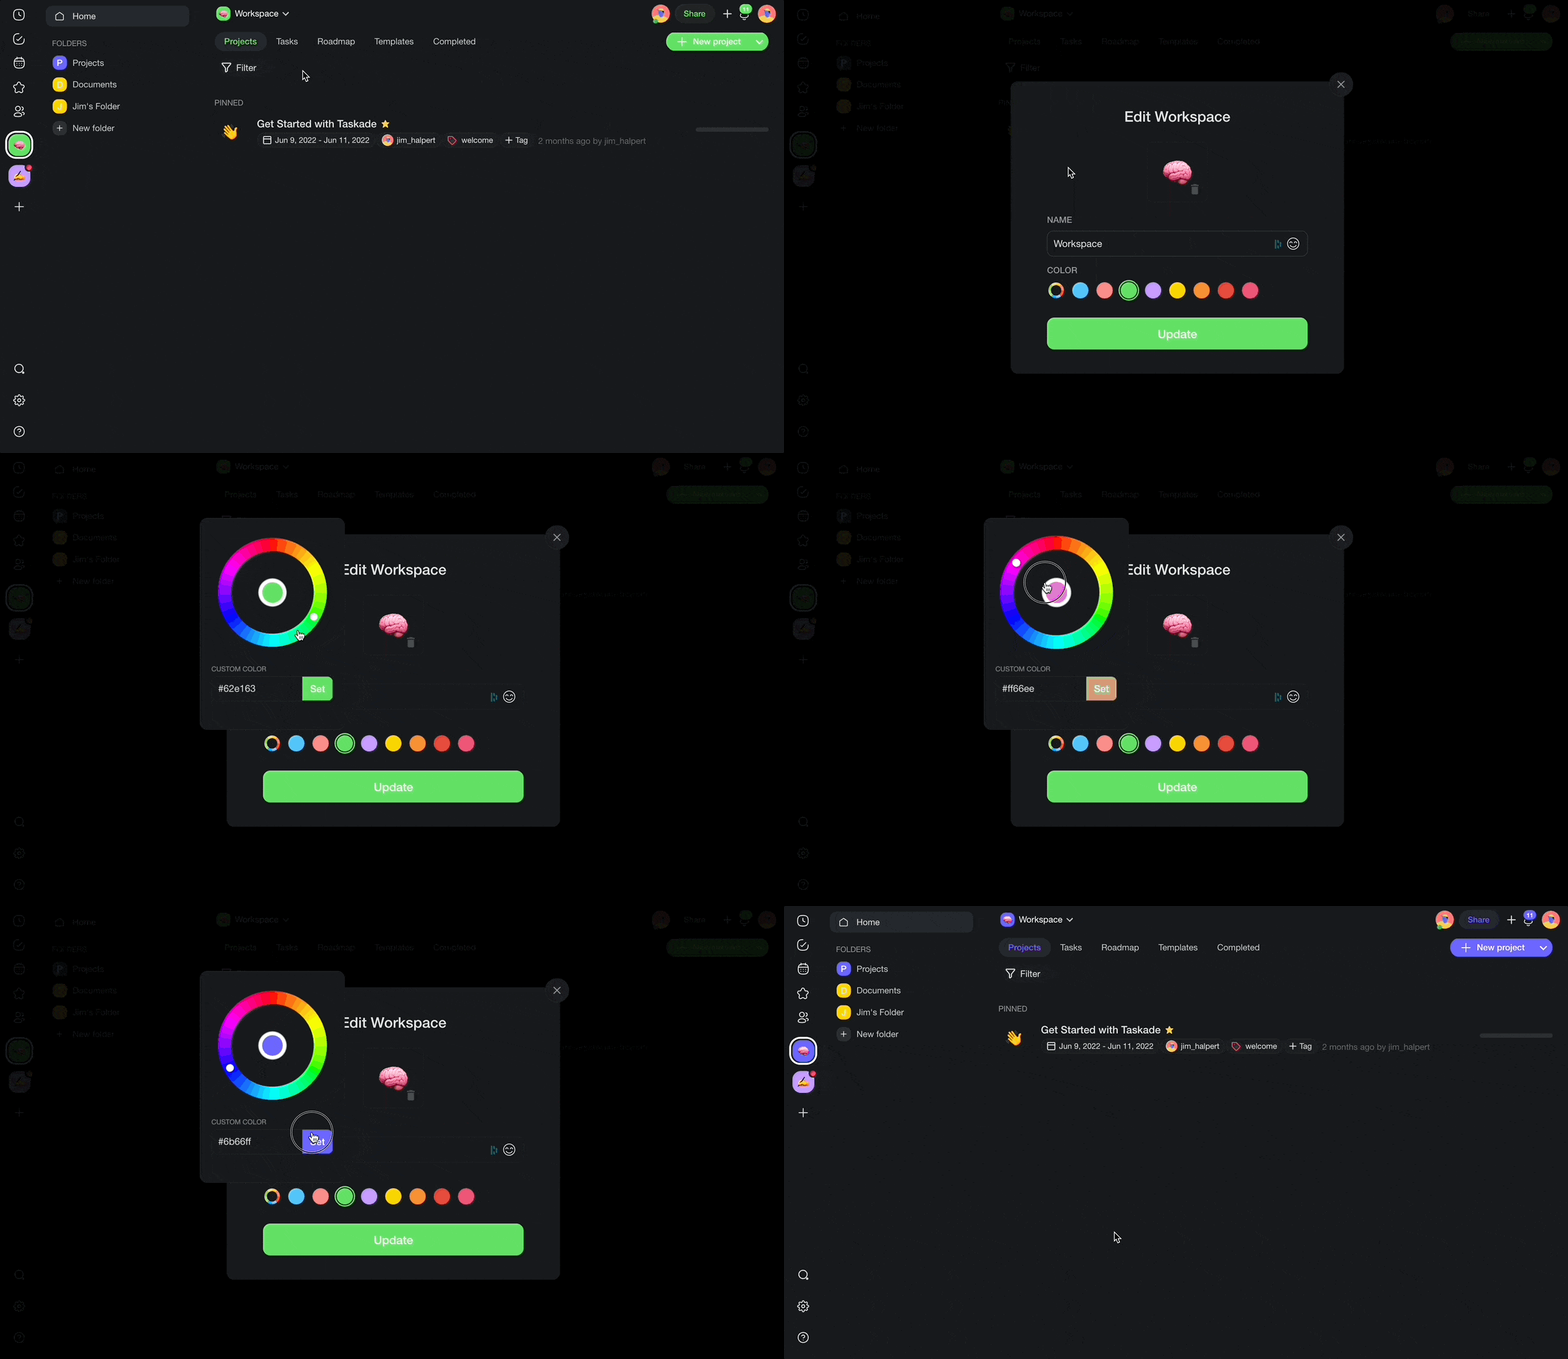
A project takes the color of its workspace or folder. The color shows on links and navigation.
Note: A new workspace or folder color changes the links and navigation in all projects inside it.
- Open the settings of the workspace or folder.
- On the General tab, find Color.
- Pick a color. For your own color, click the custom color button, enter a hex code, and click Set Color.
- Click Update.
See Make a Link Clickable for more on link colors.
Set Default Project View
The default view is the layout that everyone sees first when they open the project.
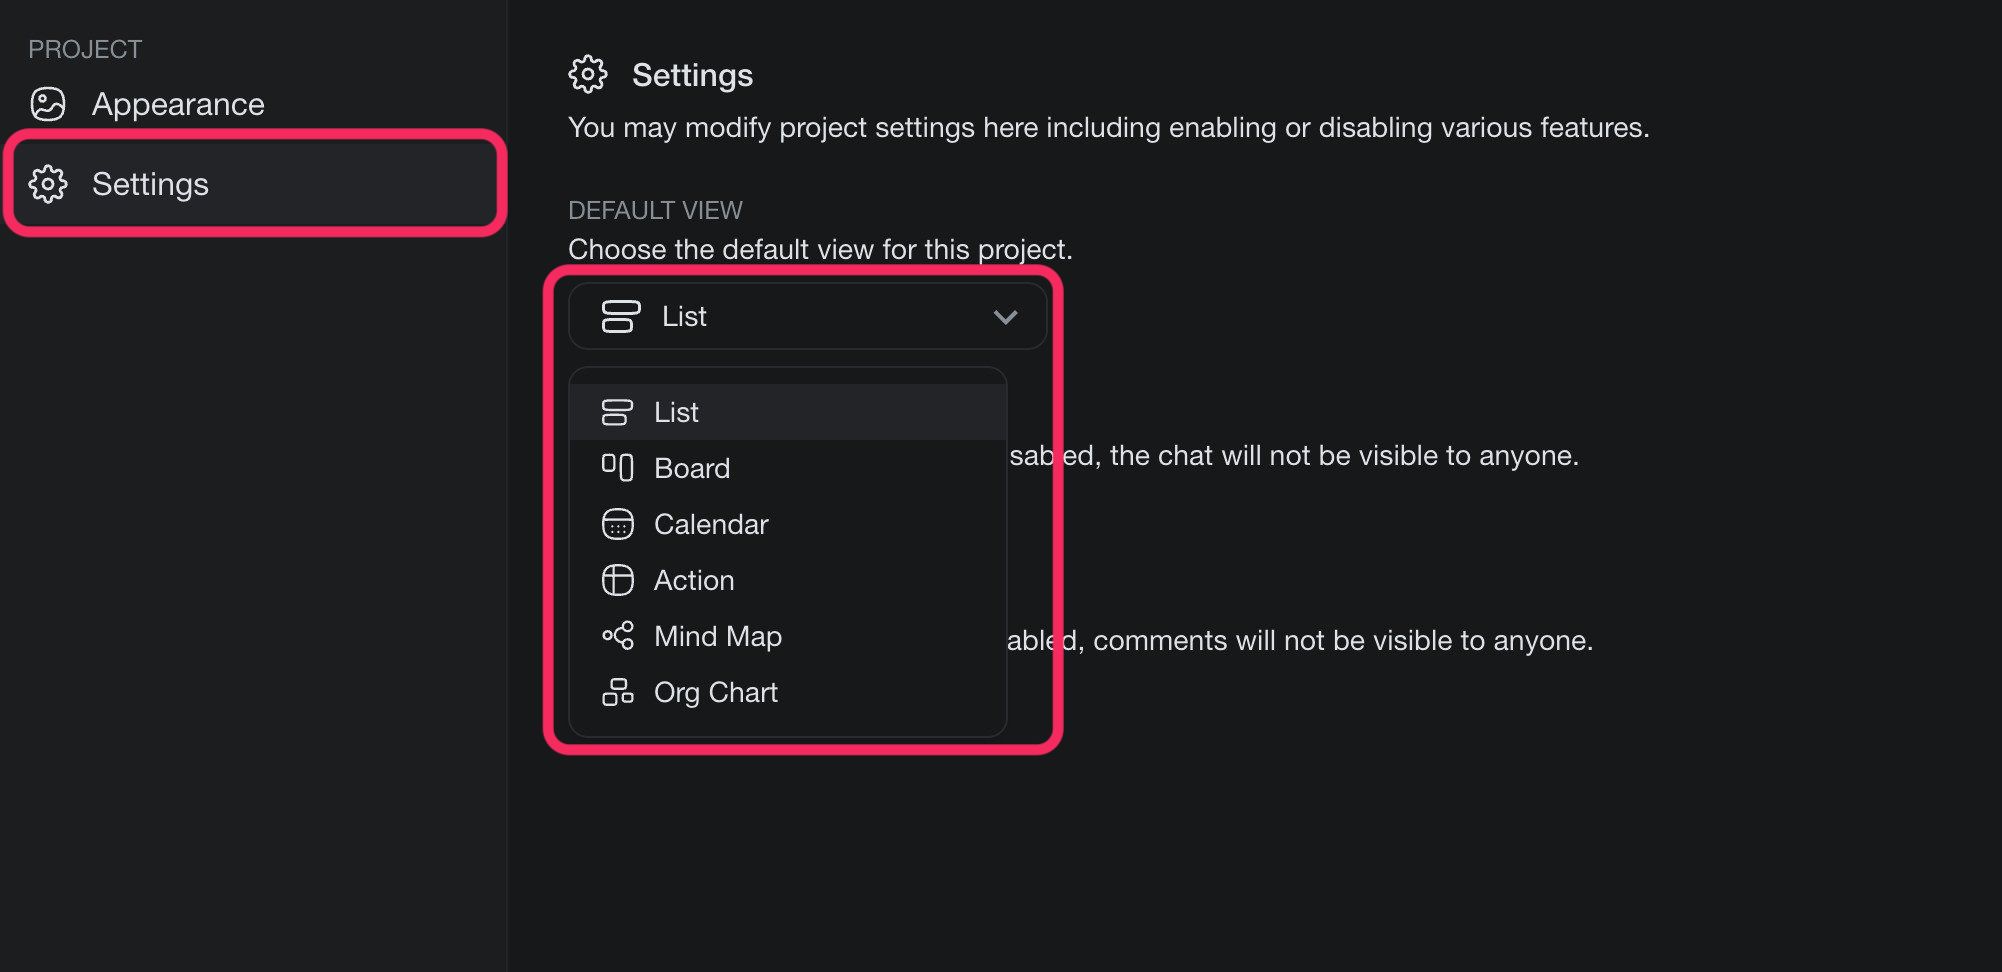
- In the project header, click Project Settings.
- Open the Settings tab.
- Under Default View, pick a view. The change saves at once.
Only the Owner or Admin role can change the default view. You can pick from these views:
- List
- Board
- Table
- Mind Map
- Docs View
- Gantt Chart (paid plan)
- Calendar
- Actionsheet (paid plan)
- Org Chart (paid plan)
Project Views Explained
Every project has multiple views. Switch at any time. Your data stays the same, and only the layout changes.
| View | Best for | Key feature |
|---|---|---|
| List | Notes, documents, nested tasks | Unlimited nesting with folding sections |
| Board | Pipelines, sprint planning | Drag cards between columns |
| Table | Databases, CRMs, structured data | Fields, sorting, and filters |
| Mind Map | Brainstorming, visual plans | Branches that open and close |
| Docs View | Long documents and specs | A page for writing |
| Gantt Chart | Timelines and dependencies | Bars with start and end dates (paid plan) |
| Calendar | Schedules, content calendars | Tasks placed by date |
| Actionsheet | Spreadsheet-style lists | A row for each task (paid plan) |
| Org Chart | Team structures, hierarchies | A top-down tree (paid plan) |
To switch views, click a tab at the top of the project: List, Board, Table, or Mind Map. The other views are in the More Views menu.
Custom Fields
Fields add structure to tasks. They show as columns in Table view.
- Open the project in Table view.
- Click the + button at the right of the column headers.
- Pick a field from a group.
- Name the field.
| Group | Fields |
|---|---|
| Build Your Own | Single select, Number, Text, Date, Password |
| Presets | Status, Priority, Type of Task, Progress, Estimated Time, Department |
| Addons | Agents, Due Date, Assignee, Comments, Reactions, Timer, Attachments, Created Date, Created By, Completed Date, Completed By |
See Custom Fields for each field type.
Project Templates
A template saves the design and structure of a project, so each new project starts the same way.
- Next to Projects in the sidebar, click + (Create project).
- Click Use Template to start from a ready template.
To save your own project as a template, open the project More (⋮) menu and click Add to Templates. Your templates live on the Templates tab of the workspace or folder. See Taskade Templates for all the steps.
Tip: Ask Taskade EVE in your workspace to generate a project from scratch. For example: "Create a product launch checklist" or "Build an employee onboarding tracker."
Sorting and Filtering
Sort and filter to find the tasks that matter now. The data does not change.
Sort (List view): open the More menu, then Sort By. The options are:
- Completed or Uncompleted
- A to Z or Z to A
- Tag or Mention
- Due Date, Start Date, or Date Created
Filter: type in the filter bar ("Filter by word, @mention, #tag or assignee..."). In Table view, open a column menu and click Filter.
Hide finished work: open the More menu and click Hide completed.
Some sort options need a paid plan. On the Free plan, the menu shows an upgrade message for them.
Sharing and Permissions
Roles control who can see and edit a project, from Owner to Viewer.
| Role | What the role can do |
|---|---|
| Owner | Fully manage and delete the project |
| Admin | Fully manage the project |
| Editor | Edit the project. Cannot manage the project. |
| Checker | Check, uncheck, and comment on tasks. Cannot edit tasks, projects, or templates. Needs a paid plan. |
| Viewer | Comment and chat only. Cannot edit the project. |
To share a project:
- In the project header, click Share.
- Open the Share Link tab and turn the link on.
- Under Permissions, pick Editor, Checker, or Viewer.
- Click Copy Link, and send it.
To invite by email, use the Email tab. See Share a Project for the Embed and Publish tabs.
Tip: Ask Taskade EVE in your workspace to change a project for you. Try: "Add a status field to my task list."
Frequently Asked Questions
How do I change the wallpaper of a project?
Open Project Settings → Appearance, and pick an image, a color, a gradient, or artwork. You can also upload your own image. Gradients, artwork, and uploads need a paid plan.
Where does the link color of a project come from?
The link color comes from the workspace or folder that holds the project. Change the Color in the workspace or folder settings and click Update.
Who can set the default view of a project?
The Owner or Admin role can set it. The change saves as soon as you pick a view, and everyone sees that view first.
Which project views need a paid plan?
Gantt Chart, Actionsheet, and Org Chart need a paid plan. List, Board, Table, Mind Map, Docs View, and Calendar work on every plan, Free included.
Can I reuse a project design?
Yes. Open the project More menu and click Add to Templates. New projects from that template start with the same structure.
Next Steps
Grow the project after you style it.
- Pick the right view: Compare layouts in What Are Project Views?.
- Add structure: Track more data with Custom Fields.
- Reuse the design: Save it in Taskade Templates.
- Style the workspace: Set its icon and color in Change Workspace Color & Icon.
- Share it: Invite your team in Share a Project.