

Overview
Publishing turns the app you built with Taskade Genesis into a real, live website your customers and team can use. Click Publish once and your app gets a shareable web address that works on any device, a secure connection, optional password protection, an optional branded domain like yourcompany.com, and a built-in dashboard that shows you who is using it. A solo realtor can publish an inbound CRM site for new leads. A field-service business can publish a customer portal where clients log in to see their jobs and invoices.
TL;DR: Click Publish to take your app live. You get a shareable web address that works on any device, a secure connection, optional password protection, an optional branded domain, a usage dashboard, and free hosting (your visitors never use your AI credits). Publish to just your team, the whole world, or the Community Gallery. Publish your app →

What "Publish" Means
Once published, your app gets:
- A live, shareable web address that works on any device
- Updates that everyone sees instantly, with no refresh needed
- A working app powered by your own Taskade workspace, so the data lives where your team already works
- The option to let others copy your app into their own workspace (if you turn this on)
An app's lifecycle is reversible — Published is a state you can edit, re-publish, or unpublish at any time. Custom domain, embedding, and forking are all layers on top of a single live URL.
💡 Note: Want to collaborate on your apps with other workspace members? Visit our guide on how to invite others to your app spaces.
Share Your App
Sharing makes your app available to anyone with the link.
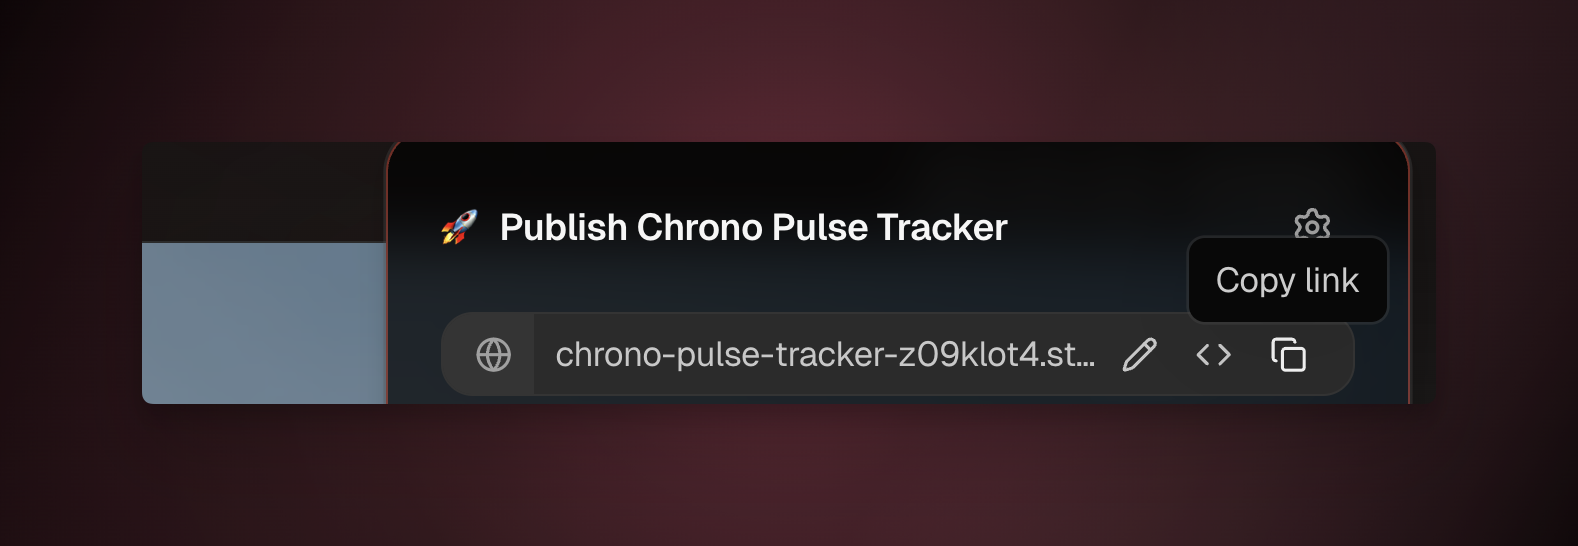
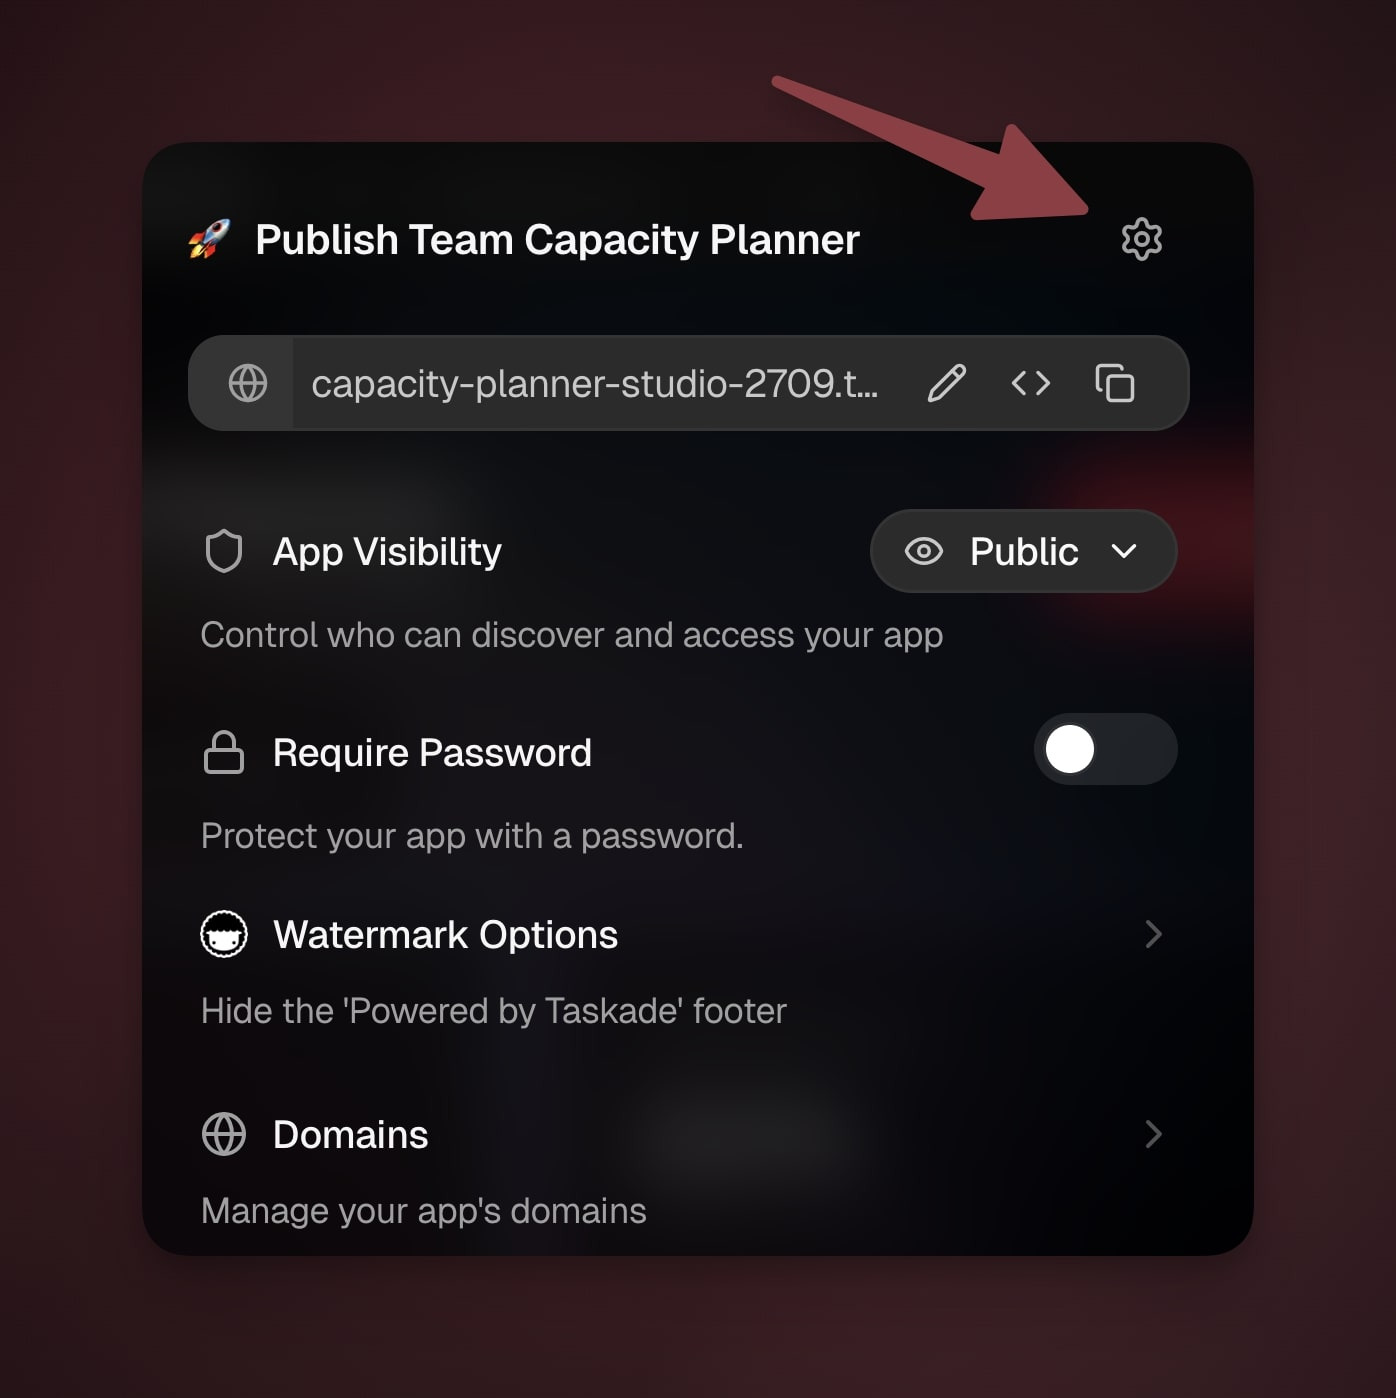
- Open Publish: Click the Publish button in the top-right.
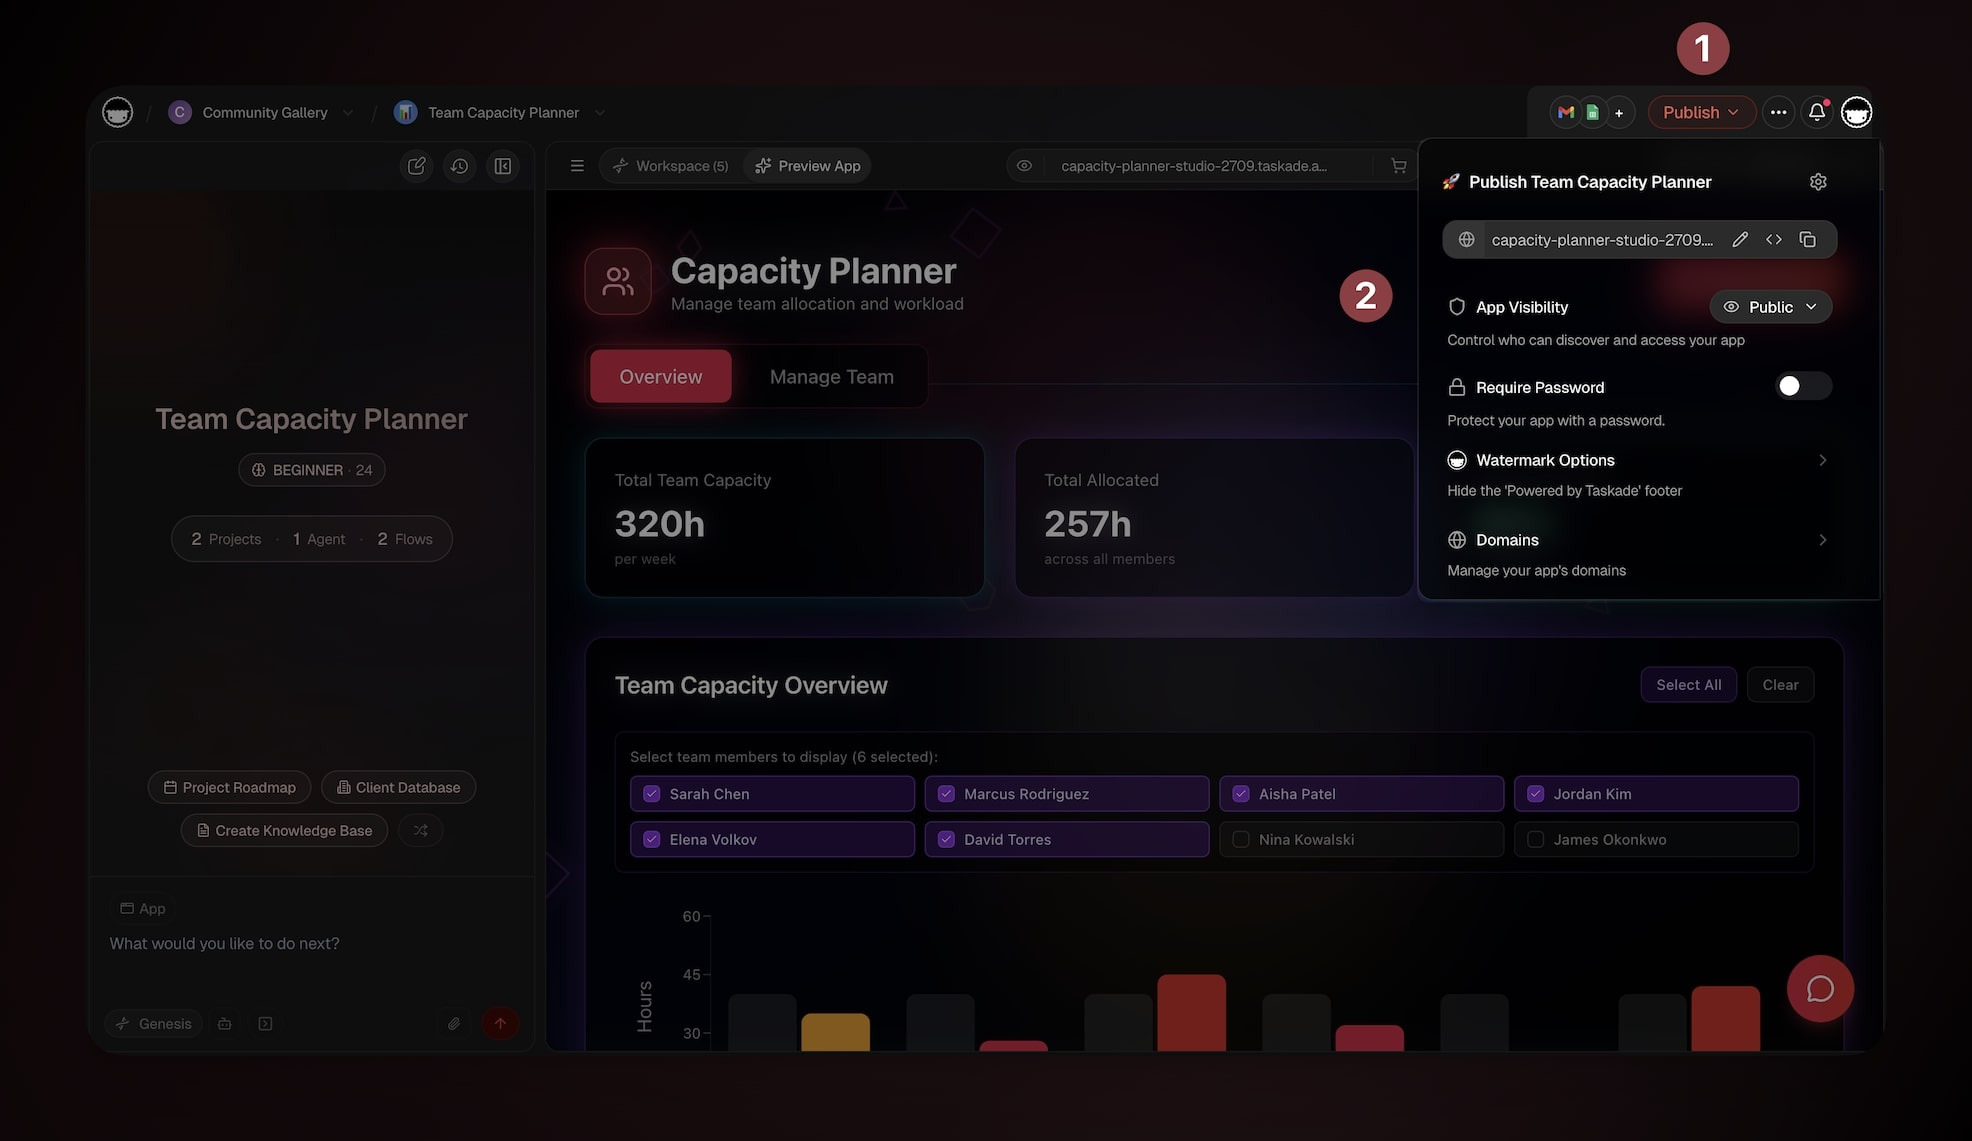
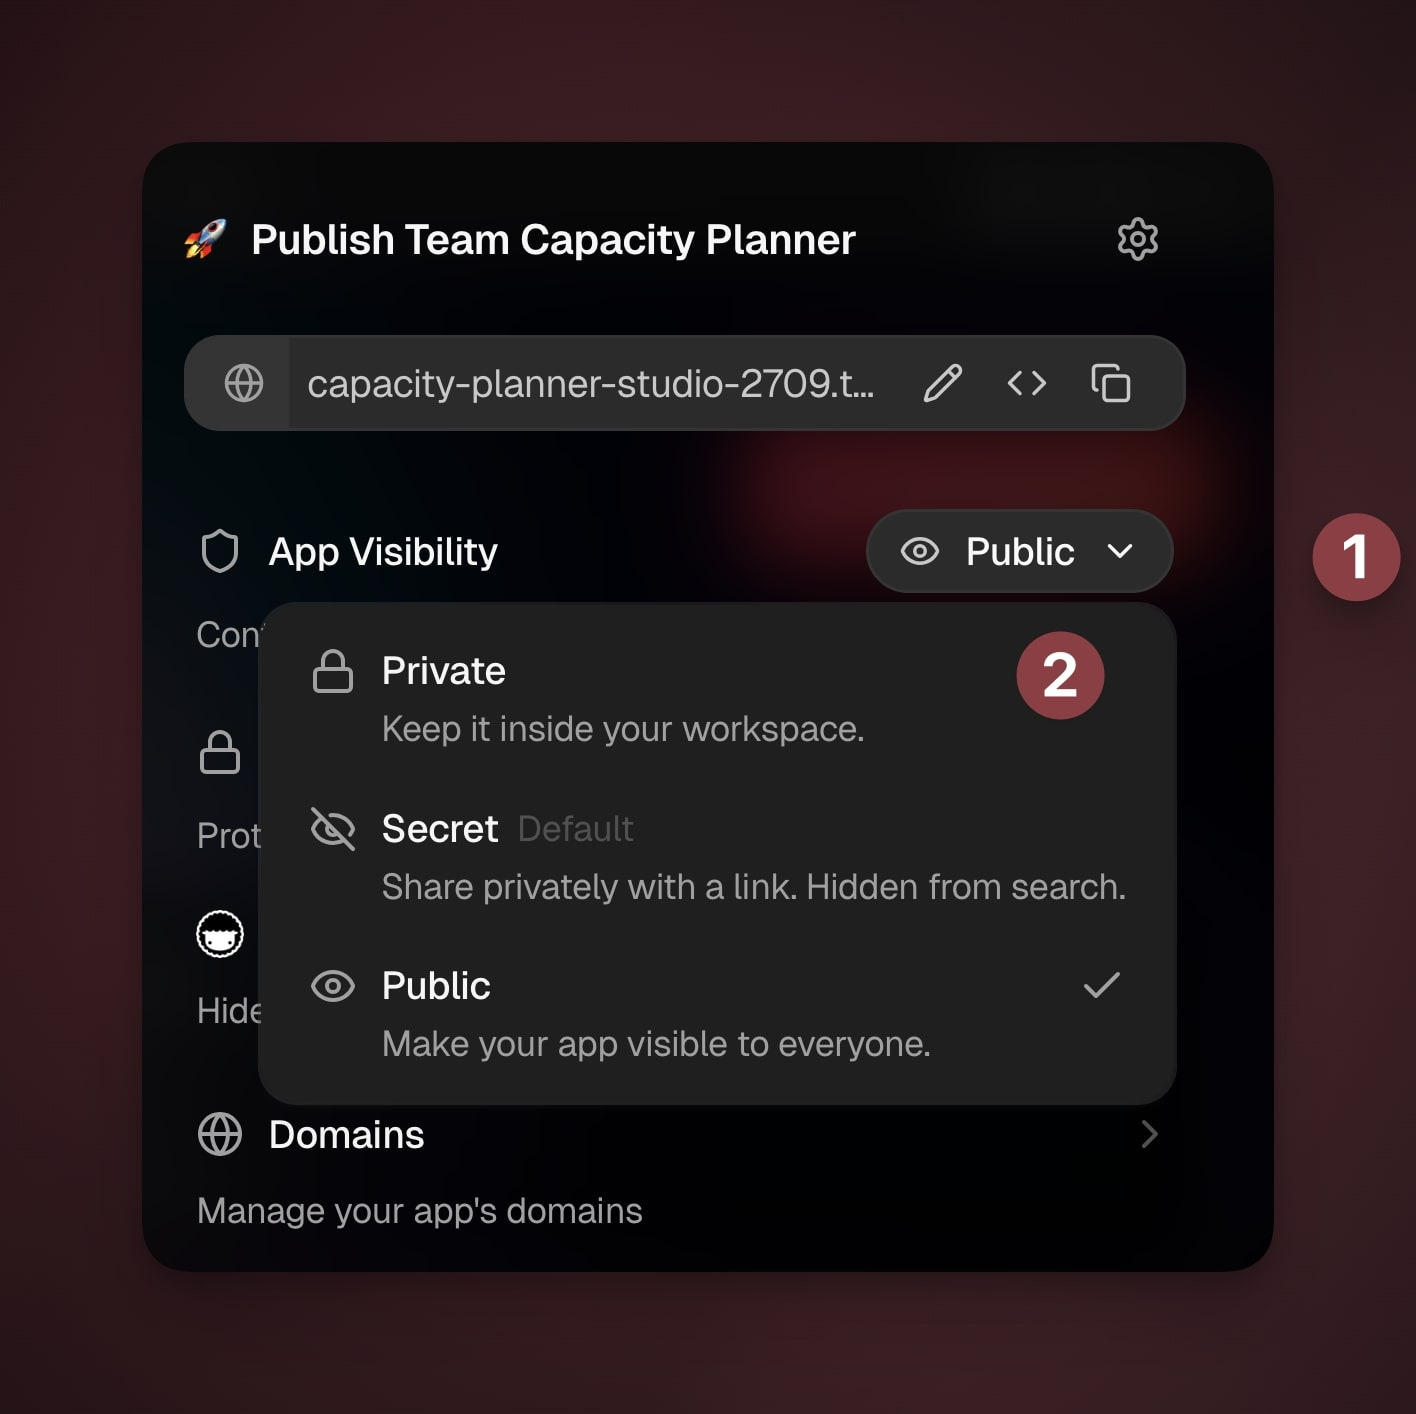
- Set visibility: Choose Private, Secret (link only), or Public.
The Publish panel: pick a visibility, protect with a password, manage your domain, and ship to the Community Gallery — all from one dropdown:
┌────────────────────────────────────────────────────────────┐
│  Taskade Genesis  ›  App Builder  ›  Publish               │
├────────────────────────────────────────────────────────────┤
│  Client Portal                            [ ● Live ]       │
│  ( ◍ ) client-portal.taskade.app    [Edit] [</>] [Copy]    │
├────────────────────────────────────────────────────────────┤
│  App Visibility                                            │
│    ○ Private   Keep it inside your workspace               │
│    ○ Secret    Share by link, hidden from search           │
│    ● Public    Visible to everyone                         │
│                                                            │
│  Password protect   [ ○ Off ]      Share as template [☐]   │
│  Custom domain      [ Manage ]     Community Gallery  [☑]  │
│                                                            │
│                                        [ Publish ]         │
└────────────────────────────────────────────────────────────┘
- Share a link, embed the app, or publish to community (scroll down for details).
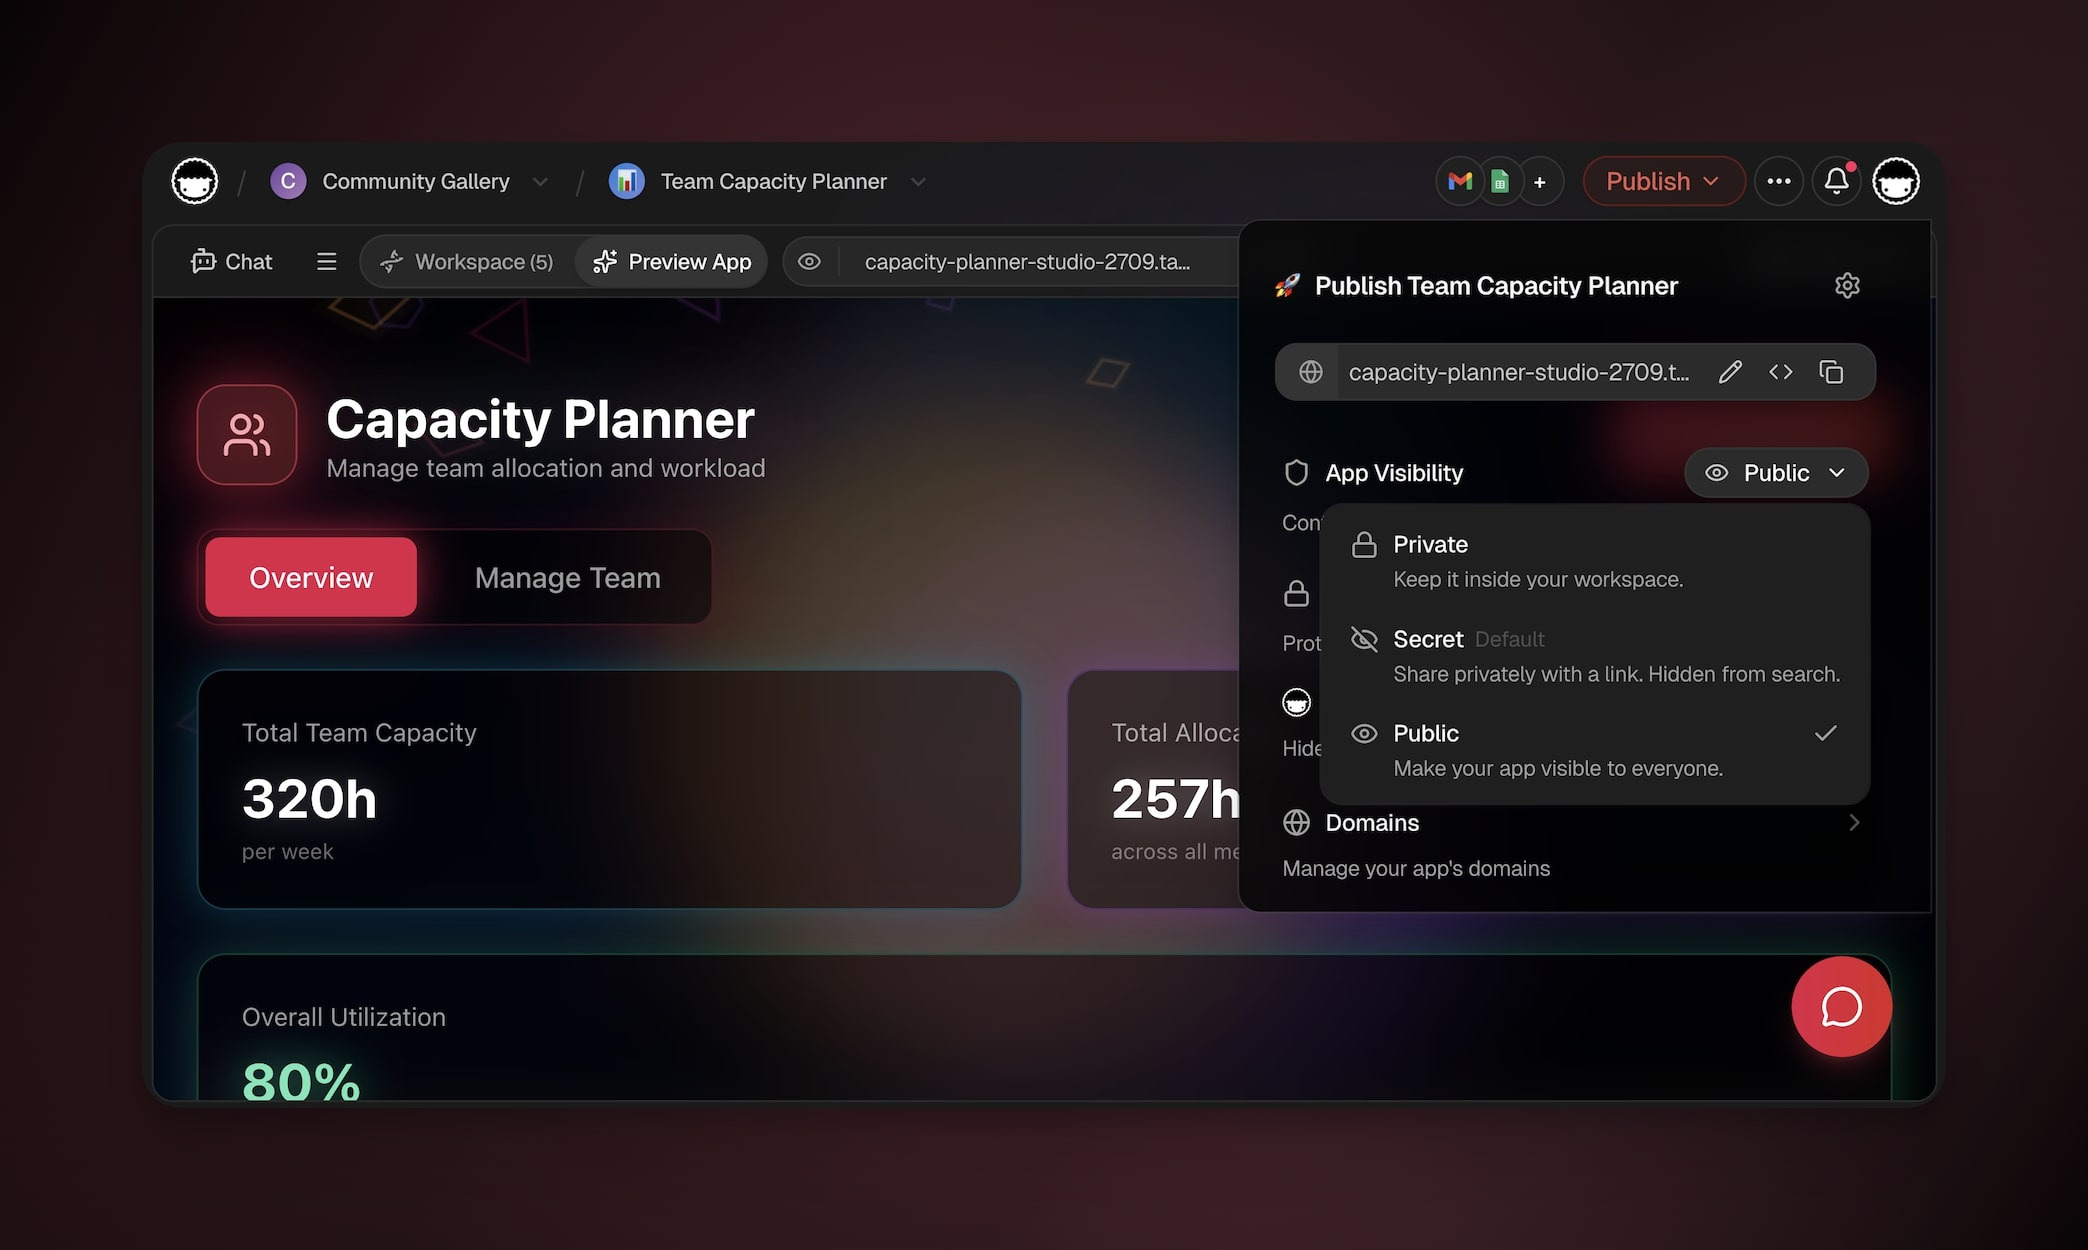
App Visibility Settings
You have three main options for how people can access your app.

Public
Discoverable by anyone; eligible for community gallery; can be cloned if enabled.
Ideal for: Broad distribution, SEO, and community growth.
Public tools and calculators
Community templates and examples
Marketing/education apps and docs
Portfolio or showcase apps
Secret
General: Hidden from search and galleries; accessible only via a private link.
Ideal for: Controlled sharing without public discovery.
Early previews you share by invitation only
Client reviews and approvals
Press or partner demos
Sales walkthroughs you send to one prospect at a time
Private
General: Kept inside your workspace; not accessible externally.
Ideal for: Internal building, testing, and sensitive workflows.
Drafts you are still building and changing
A test copy you check before sharing the real one
Internal team tools
Apps that hold confidential data
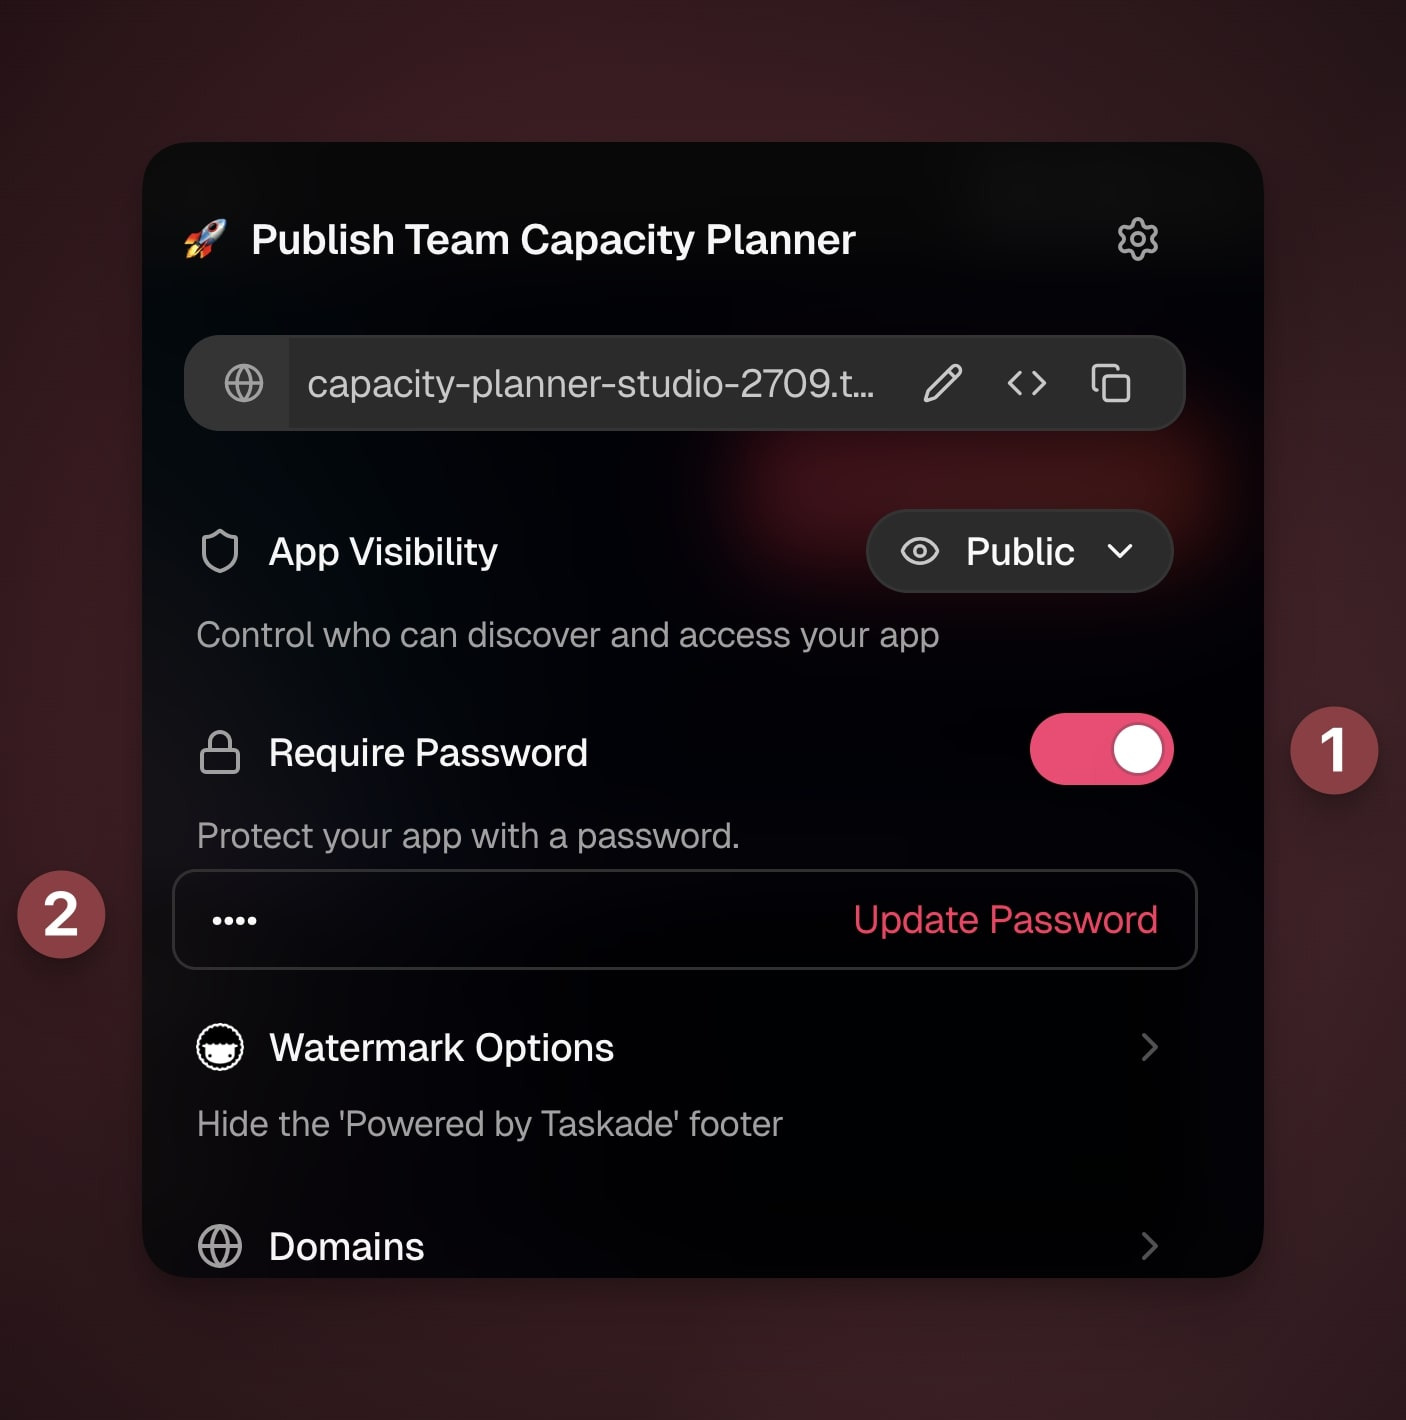
Password Protection
Add an extra layer of protection to your apps.
Click Publish → toggle Require Password.
Set a password and share it with your audience.
Click Update Password to save the changes.
Change or remove it anytime ( Publish panel or Settings → Security).
💡 Note: A single shared password is great for a quick gate, like a mental-health clinic sending one link to its clients. If you want each person to have their own private login instead, turn on App Users so clients and teammates sign in with their own account, or add single sign-on so they log in with the account they already use.
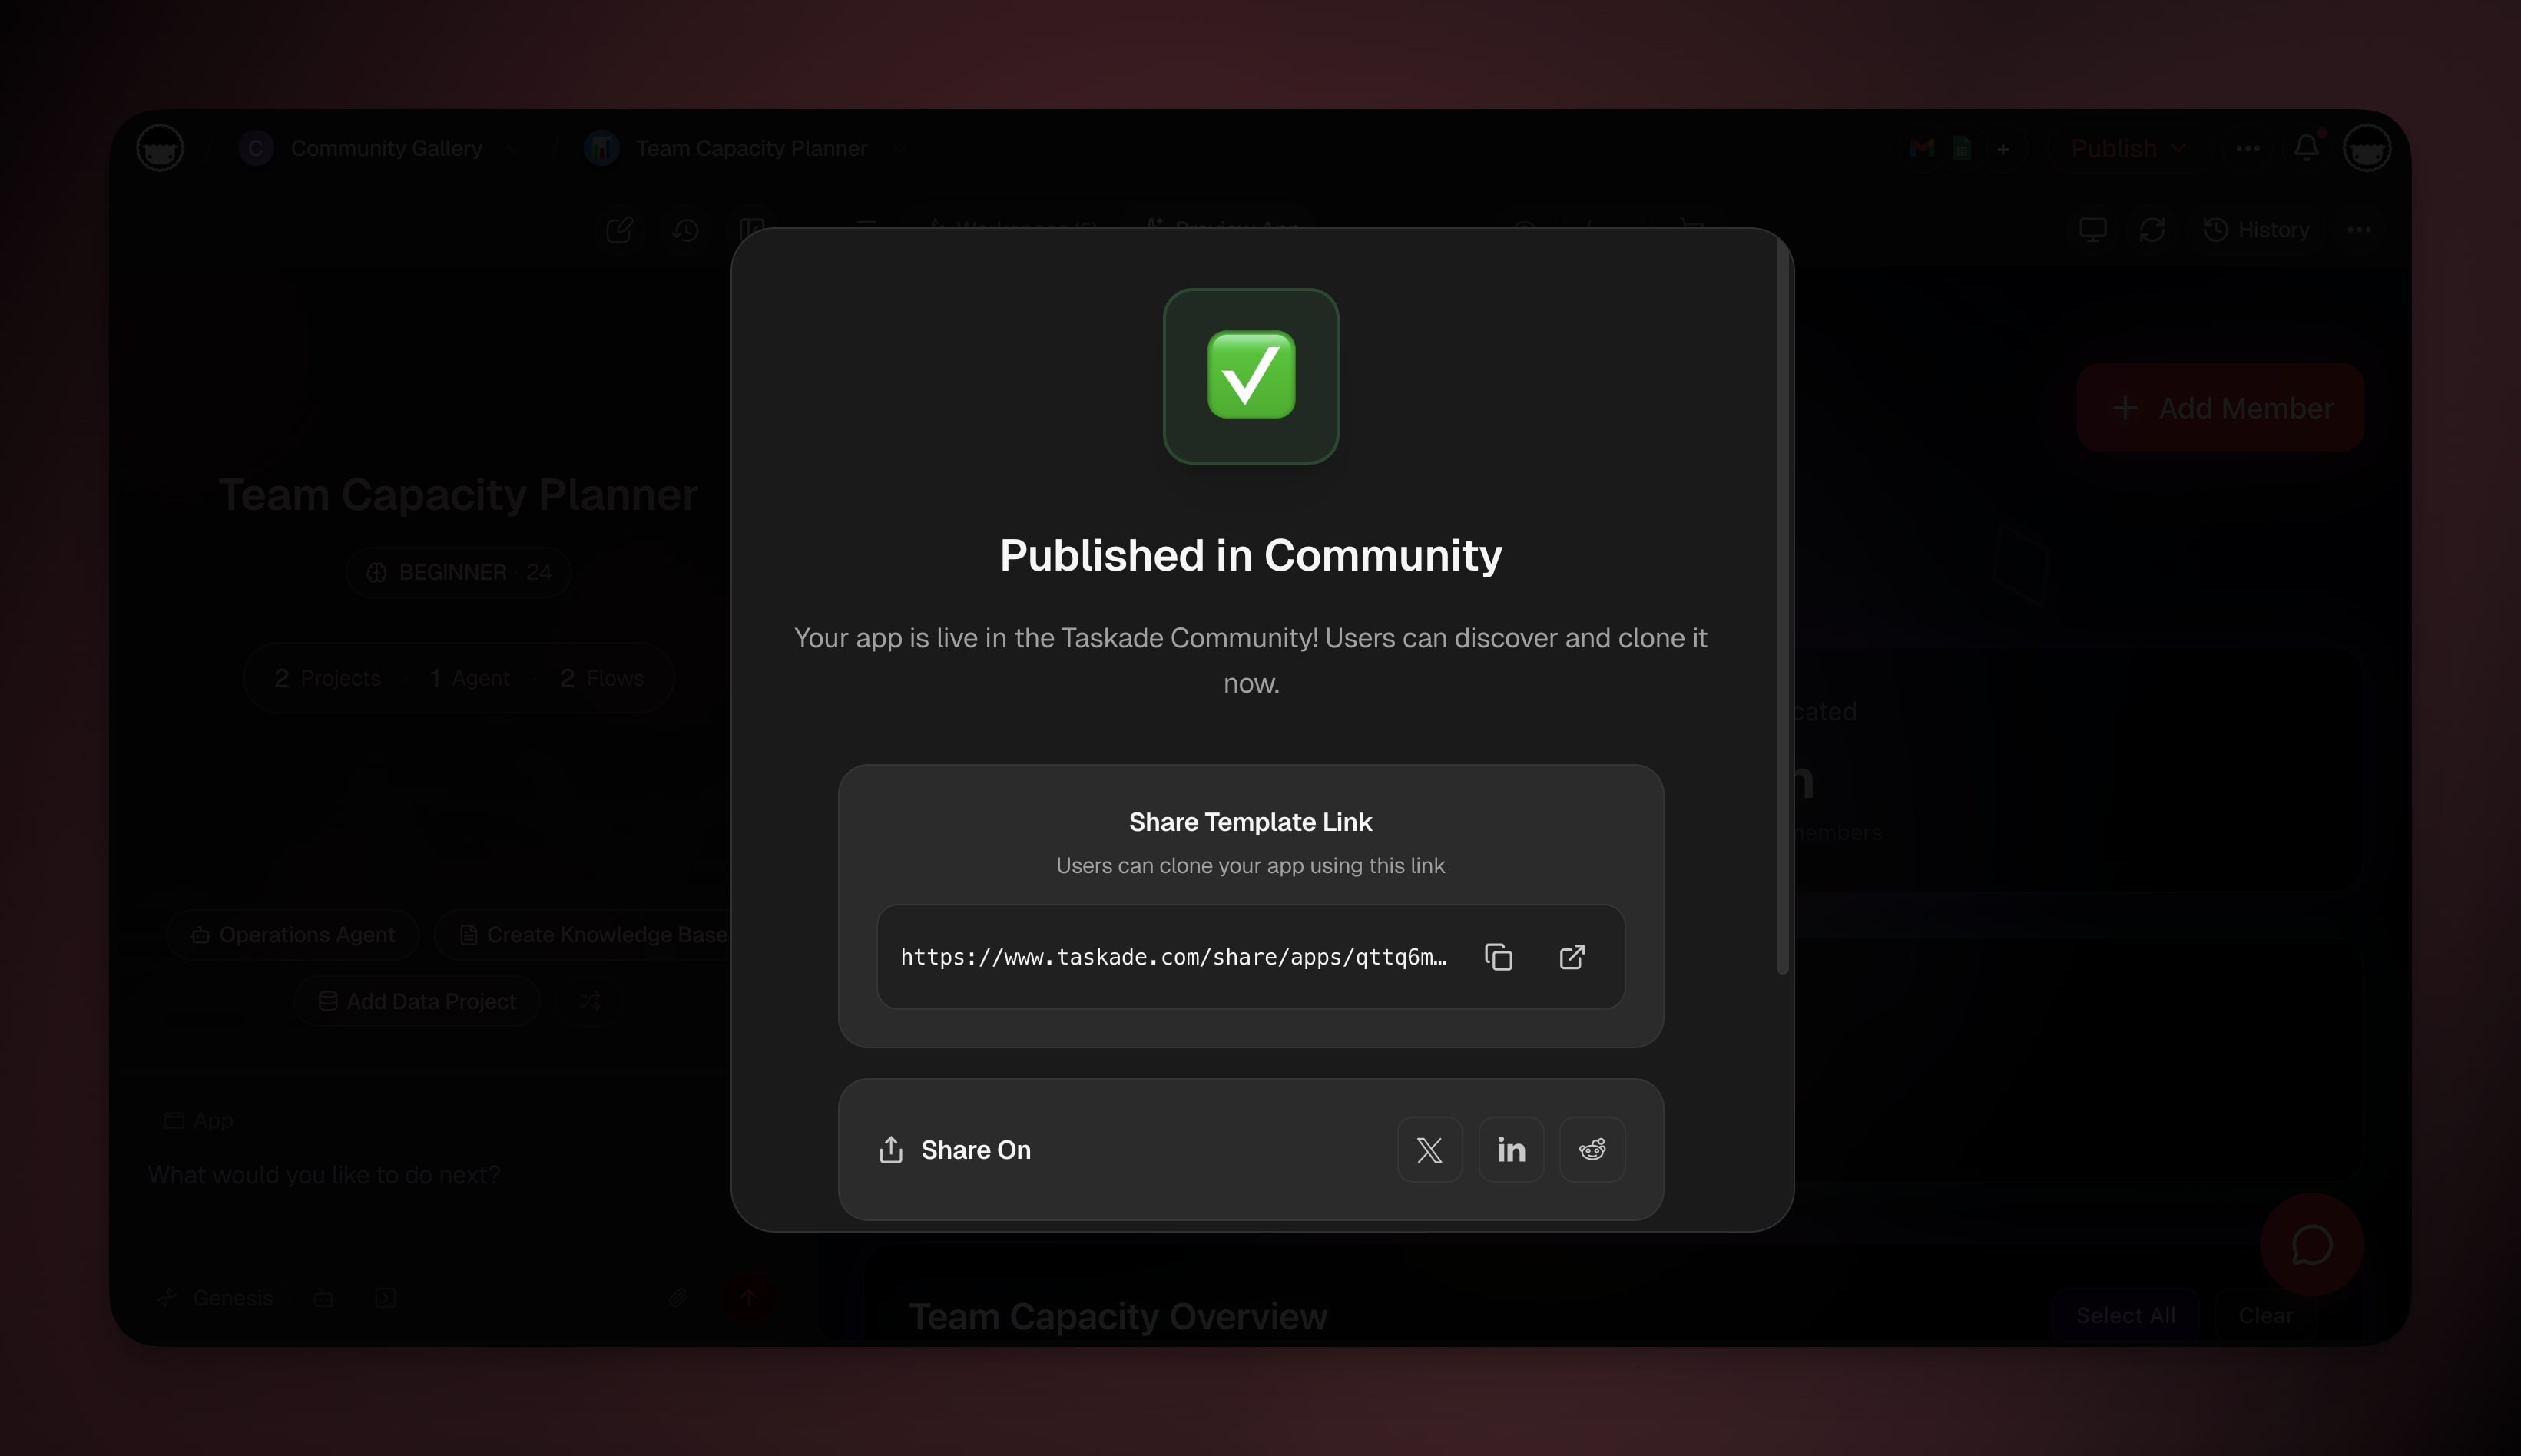
Publish to Community
Share your app in the Taskade gallery for discovery and remixing.
- Set App Visibility to Public.
- Click Publish to Community.
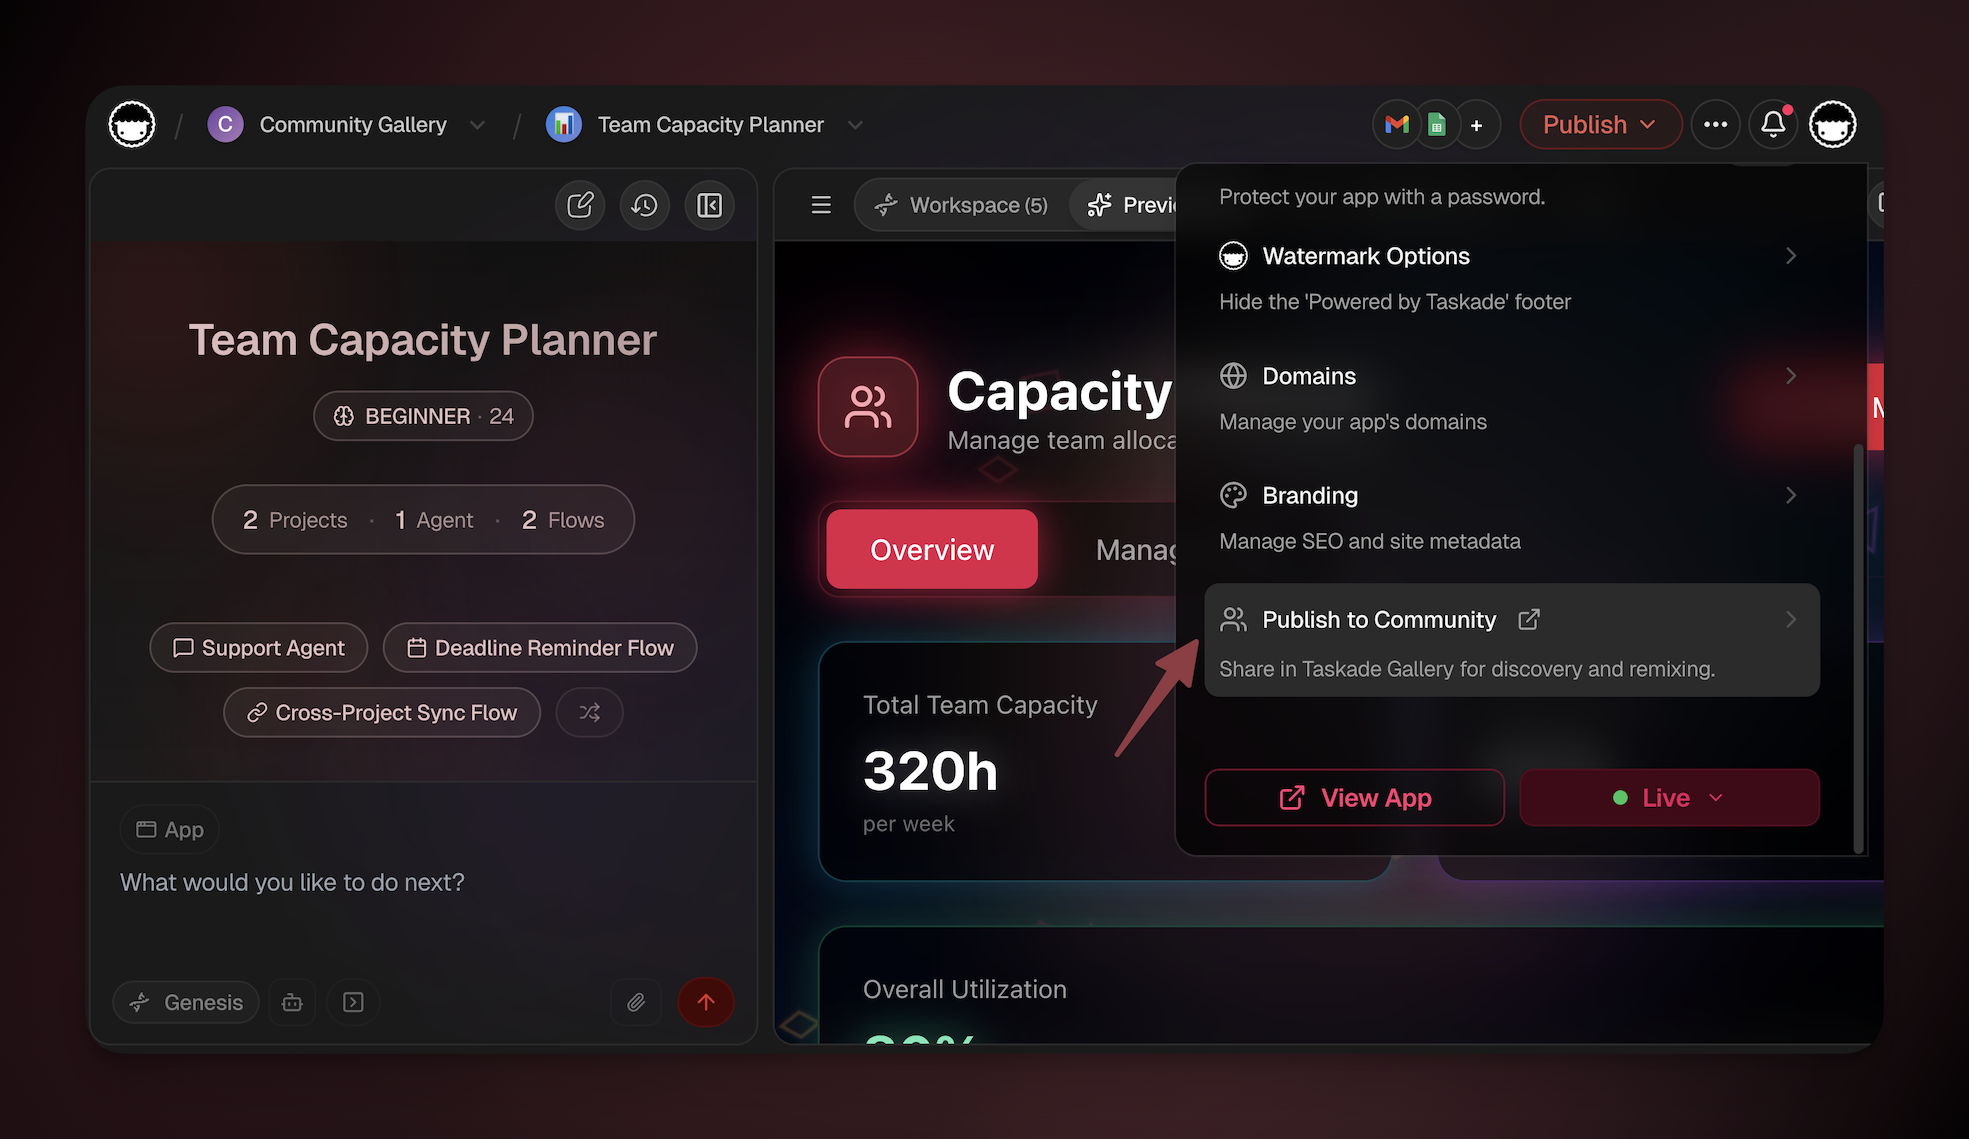
- Submit for Review → Wait for team approval.
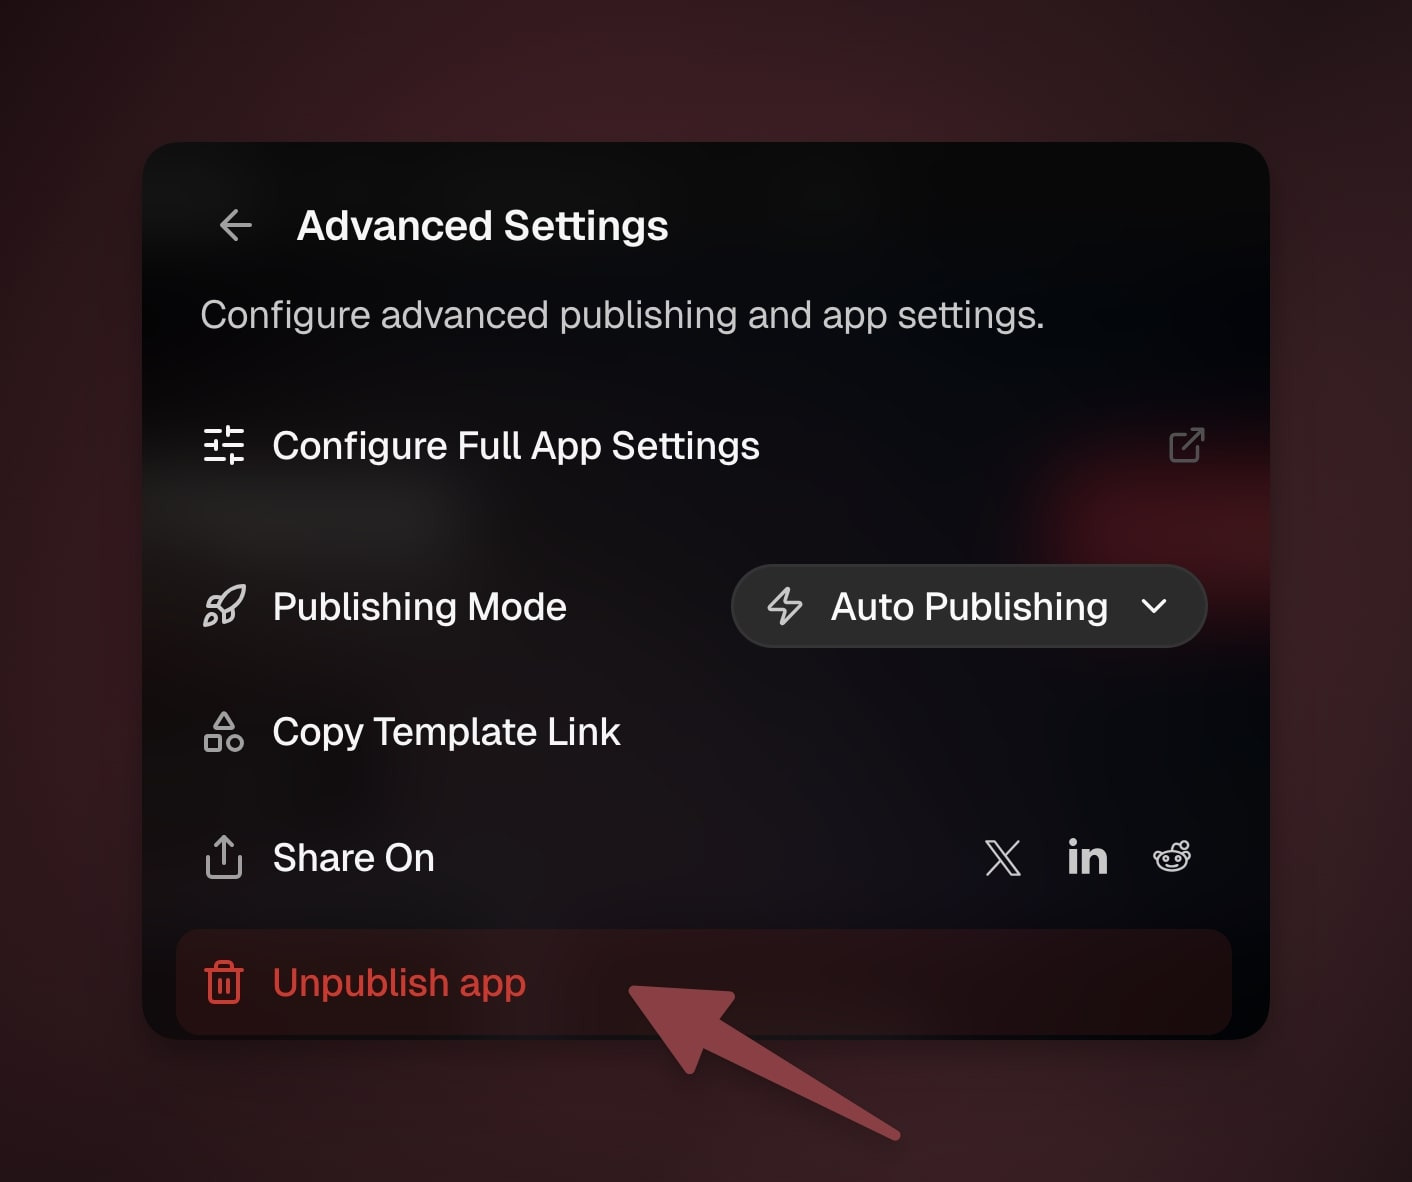
Unpublish Your App
You can always update your published app by making changes.
- Go to the Publish menu again.
- Under App Visibility(see the next section) choose Private.
- The app will no longer be accessible to others.
- If you published the app to community:
- Click the gear icon ⚙️ in the Publish drop-down.

- Choose Unpublish app from the list.
Clone and Remix
Cloning is different from just using an app. When you clone an app, you create a complete copy of the app and all its connected parts in someone else's workspace.
- Open the link to a shared Taskade Genesis app.
- Do you like what you see? Click Edit in Taskade.
- Click Clone in the top-right corner.
- Choose the Workspace where you want to add the app.
👉 After cloning:
Customize the app with your branding and content
Connect it to your Projects, Agents, and Automations
Modify features to fit your specific needs
Publish when ready
Advanced Sharing Options
Use full app settings for deeper control over publishing, branding, SEO, and domains.
- Click the gear icon ⚙️ in the Publish panel.
- Click Configure Full App Settings.
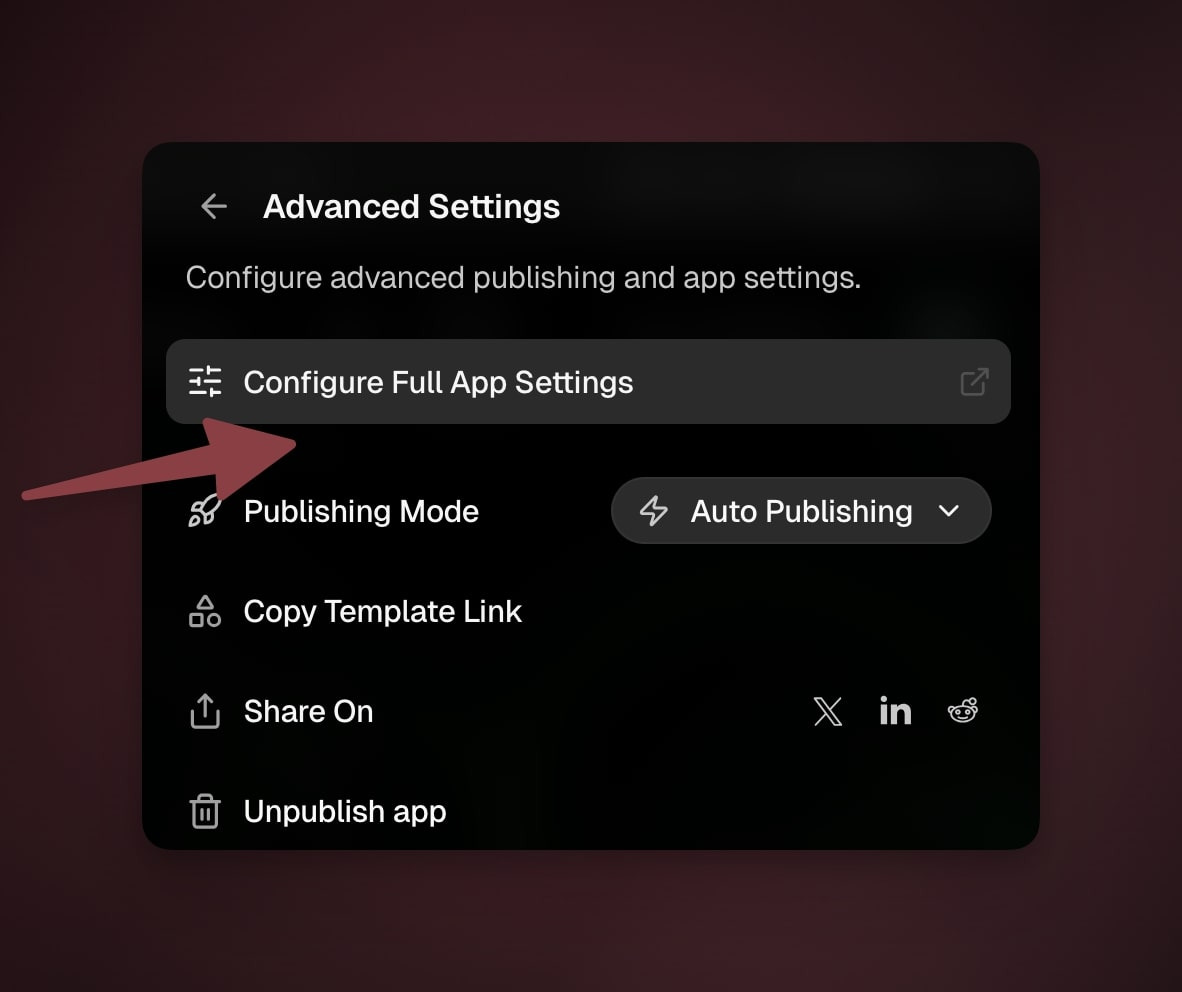
- Adjust mode, domains, and other settings (see details below).
Remove a Watermark
Control whether the “Powered by Taskade” footer appears (plan dependent).
Go to the Publish tab.
Toggle Remove Watermark on (check your plan settings).

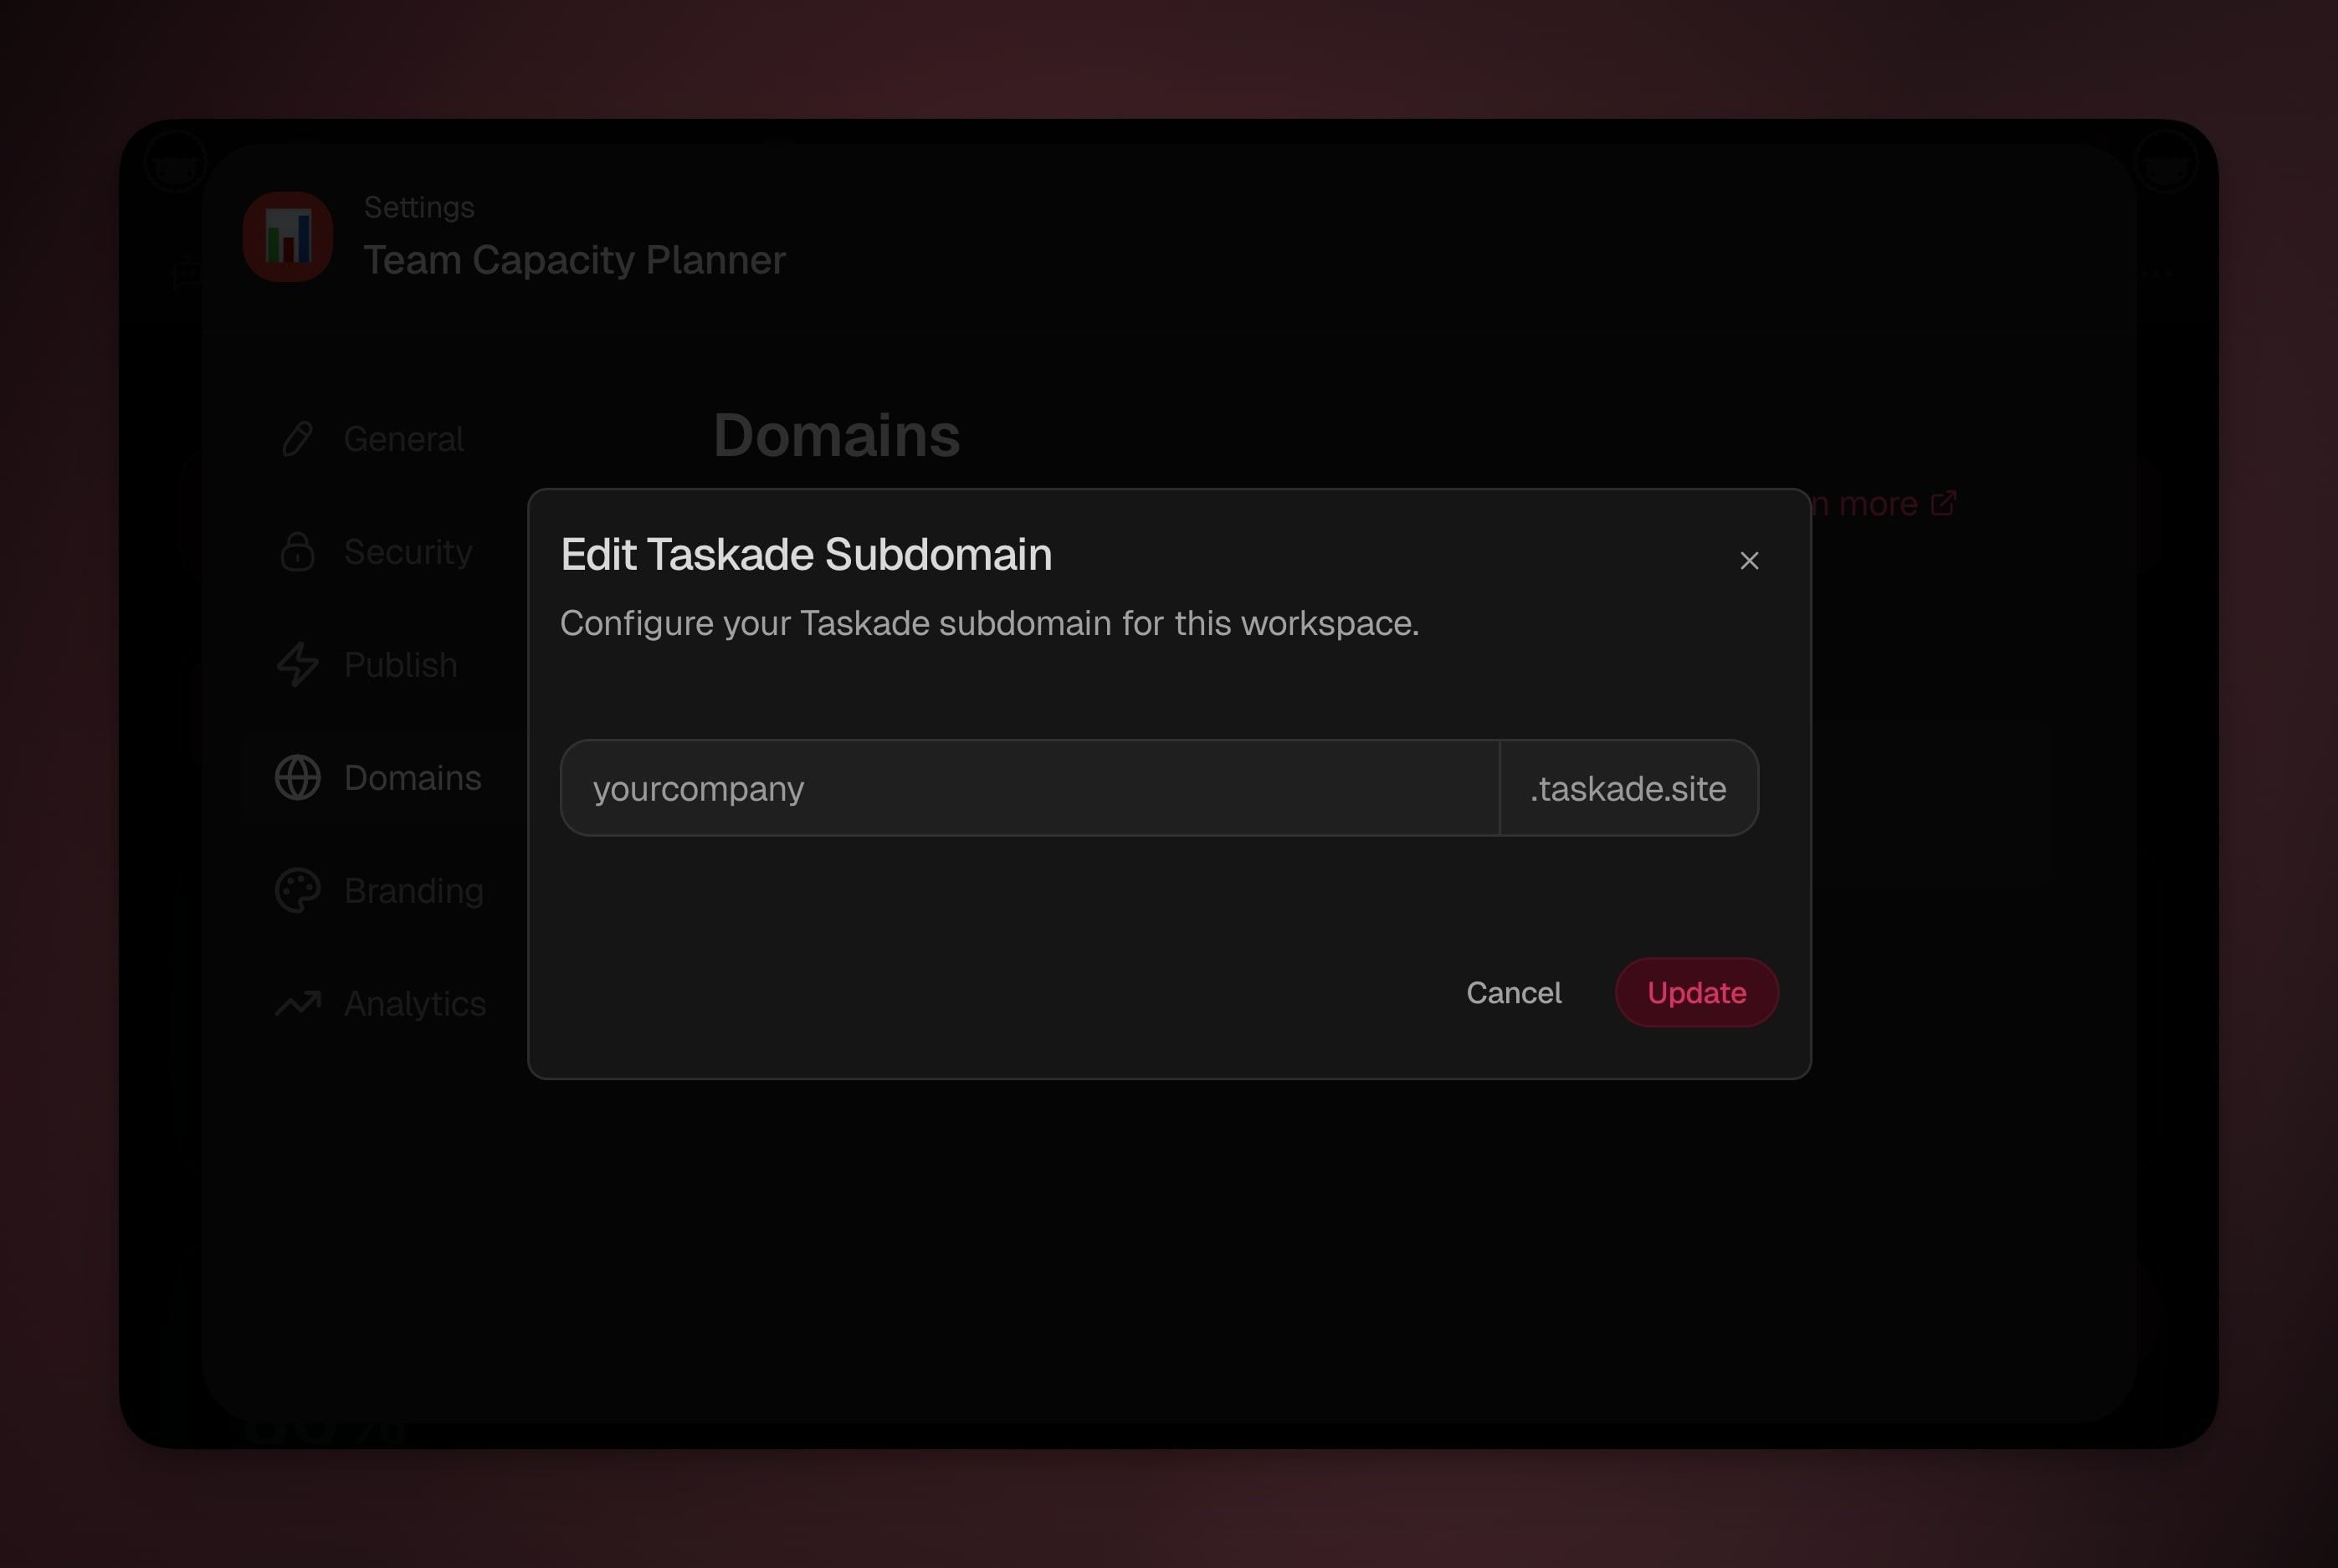
Manage Domains
Align your app with your brand and use a domain that users will recognize.
- Go to the Domains tab.

Click Buy Domain to buy a custom domain, or
Click ➕ Add Domain to:
Connect an existing custom domain.
Manage the free Taskade domain.
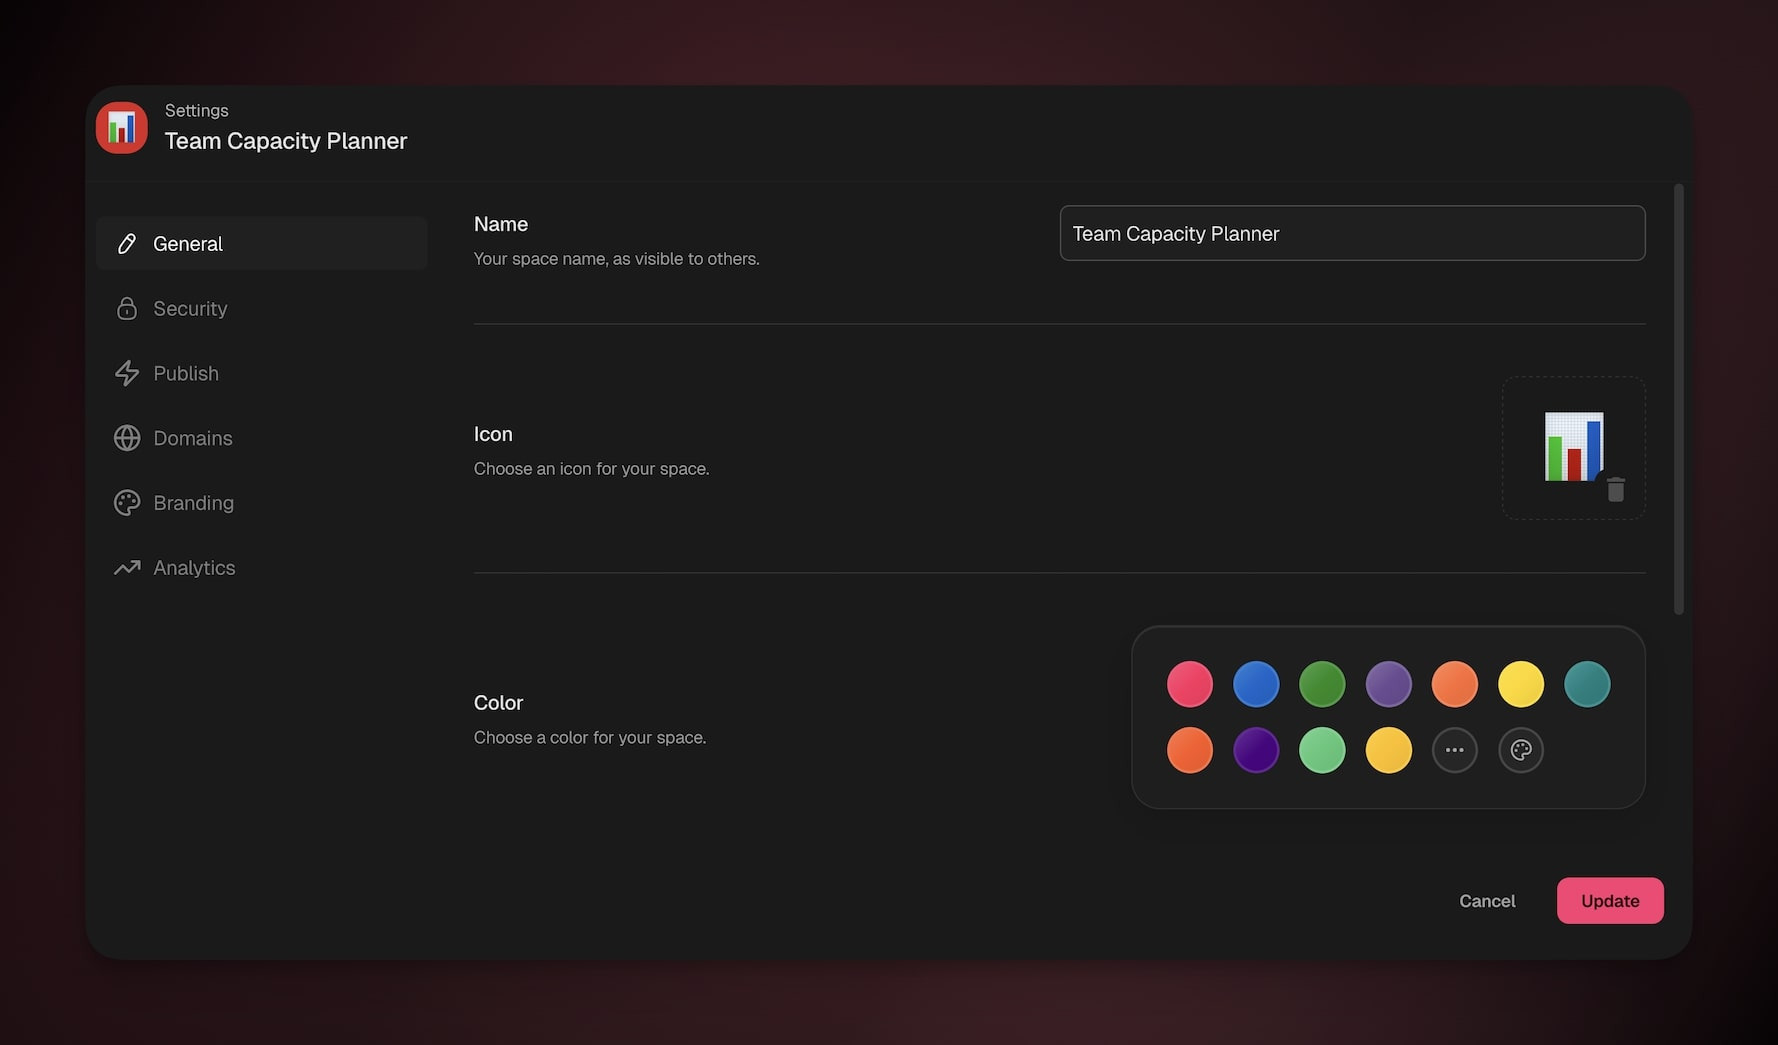
Manage Branding
Customize how your app looks, how it shows up in Google search, and how its link previews on social media.
Page Title
Set a descriptive title that appears in browser tabs and search results.
Keep it concise and descriptive of your app's purpose.
This also appears when users bookmark or share your app.
💡 Note: Keep titles under 60 characters for optimal display in search results. Focus on your app's main function or benefit.
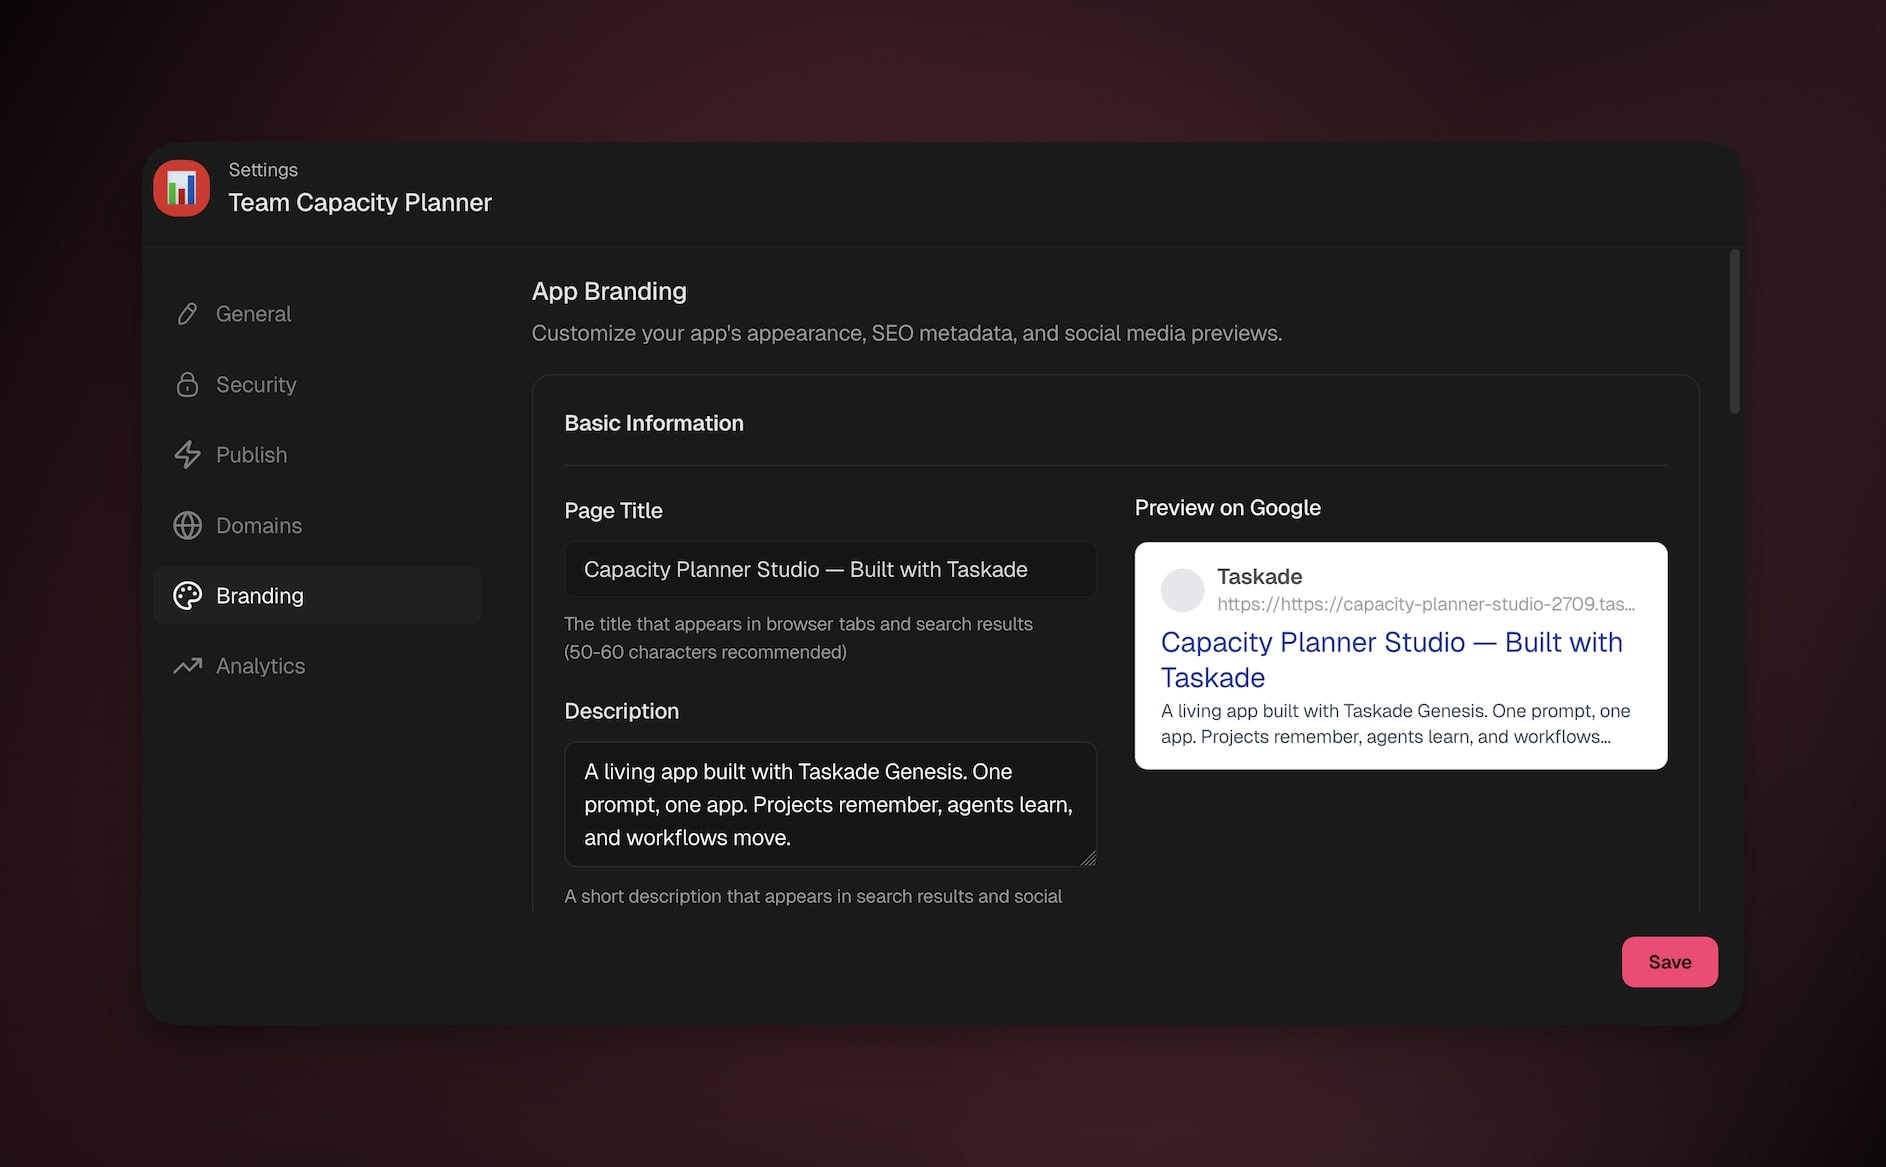
Description
Write a brief description explaining what your app does
This appears in search results and social media shares
Aim for 1-2 sentences that clearly communicate the value
Focus on the problem your app solves
💡 Note: Write descriptions between 120-160 characters for best SEO results. Think of it as your app's elevator pitch.
Site Name
Your company or organization name
This appears in various sharing contexts
Helps establish brand credibility and recognition
💡 Note: Use your official business name or brand name consistently across all platforms for better recognition.
Search Engine Visibility
Control how search engines discover and index your app. This determines whether your app appears in Google searches or stays private to invited users only.
| Option | Description | Best For |
|---|---|---|
| Allow search engines to index this page | Makes your app discoverable through search engines | Public tools, marketing apps, community resources |
| Don't allow search engines to index this page | Keeps your app private from search engine results | Internal company apps, private workflows, sensitive data |
| Allow indexing but don't follow links | App appears in search but links within the app aren't crawled | Apps with external links you don't want to promote |
| Block search engines completely | Maximum privacy - no search engine access at all | Confidential apps, beta testing, restricted access tools |
💡 Note: Not sure which option to choose? Enable indexing for public tools and disable for internal company apps or sensitive workflows.
Social Media Customization
Control how your app looks when someone shares its link, so more people click through.
- Add your Twitter/X handle (format @yourcompany).
- Review the preview cards that show on Facebook and Twitter/X.
- Adjust the title and description to make people want to click.
- Share a test post to confirm how it looks.
Visual Customization
Align your app's appearance with your brand colors and design language.
Custom Colors
- Enable Use Custom Colors in Branding.
- Set Light/Dark palettes and primary accents.
- Ensure color contrast for accessibility.
- Save and review across key pages.
💡 Note: Not sure which option to choose? Enable indexing for public tools and disable for internal company apps or sensitive workflows.
Custom Favicon
Your app's favicon appears in browser tabs, bookmarks, and mobile home screens.
- Go to App Settings → General tab
- Under Icon, choose an emoji or upload a custom icon.
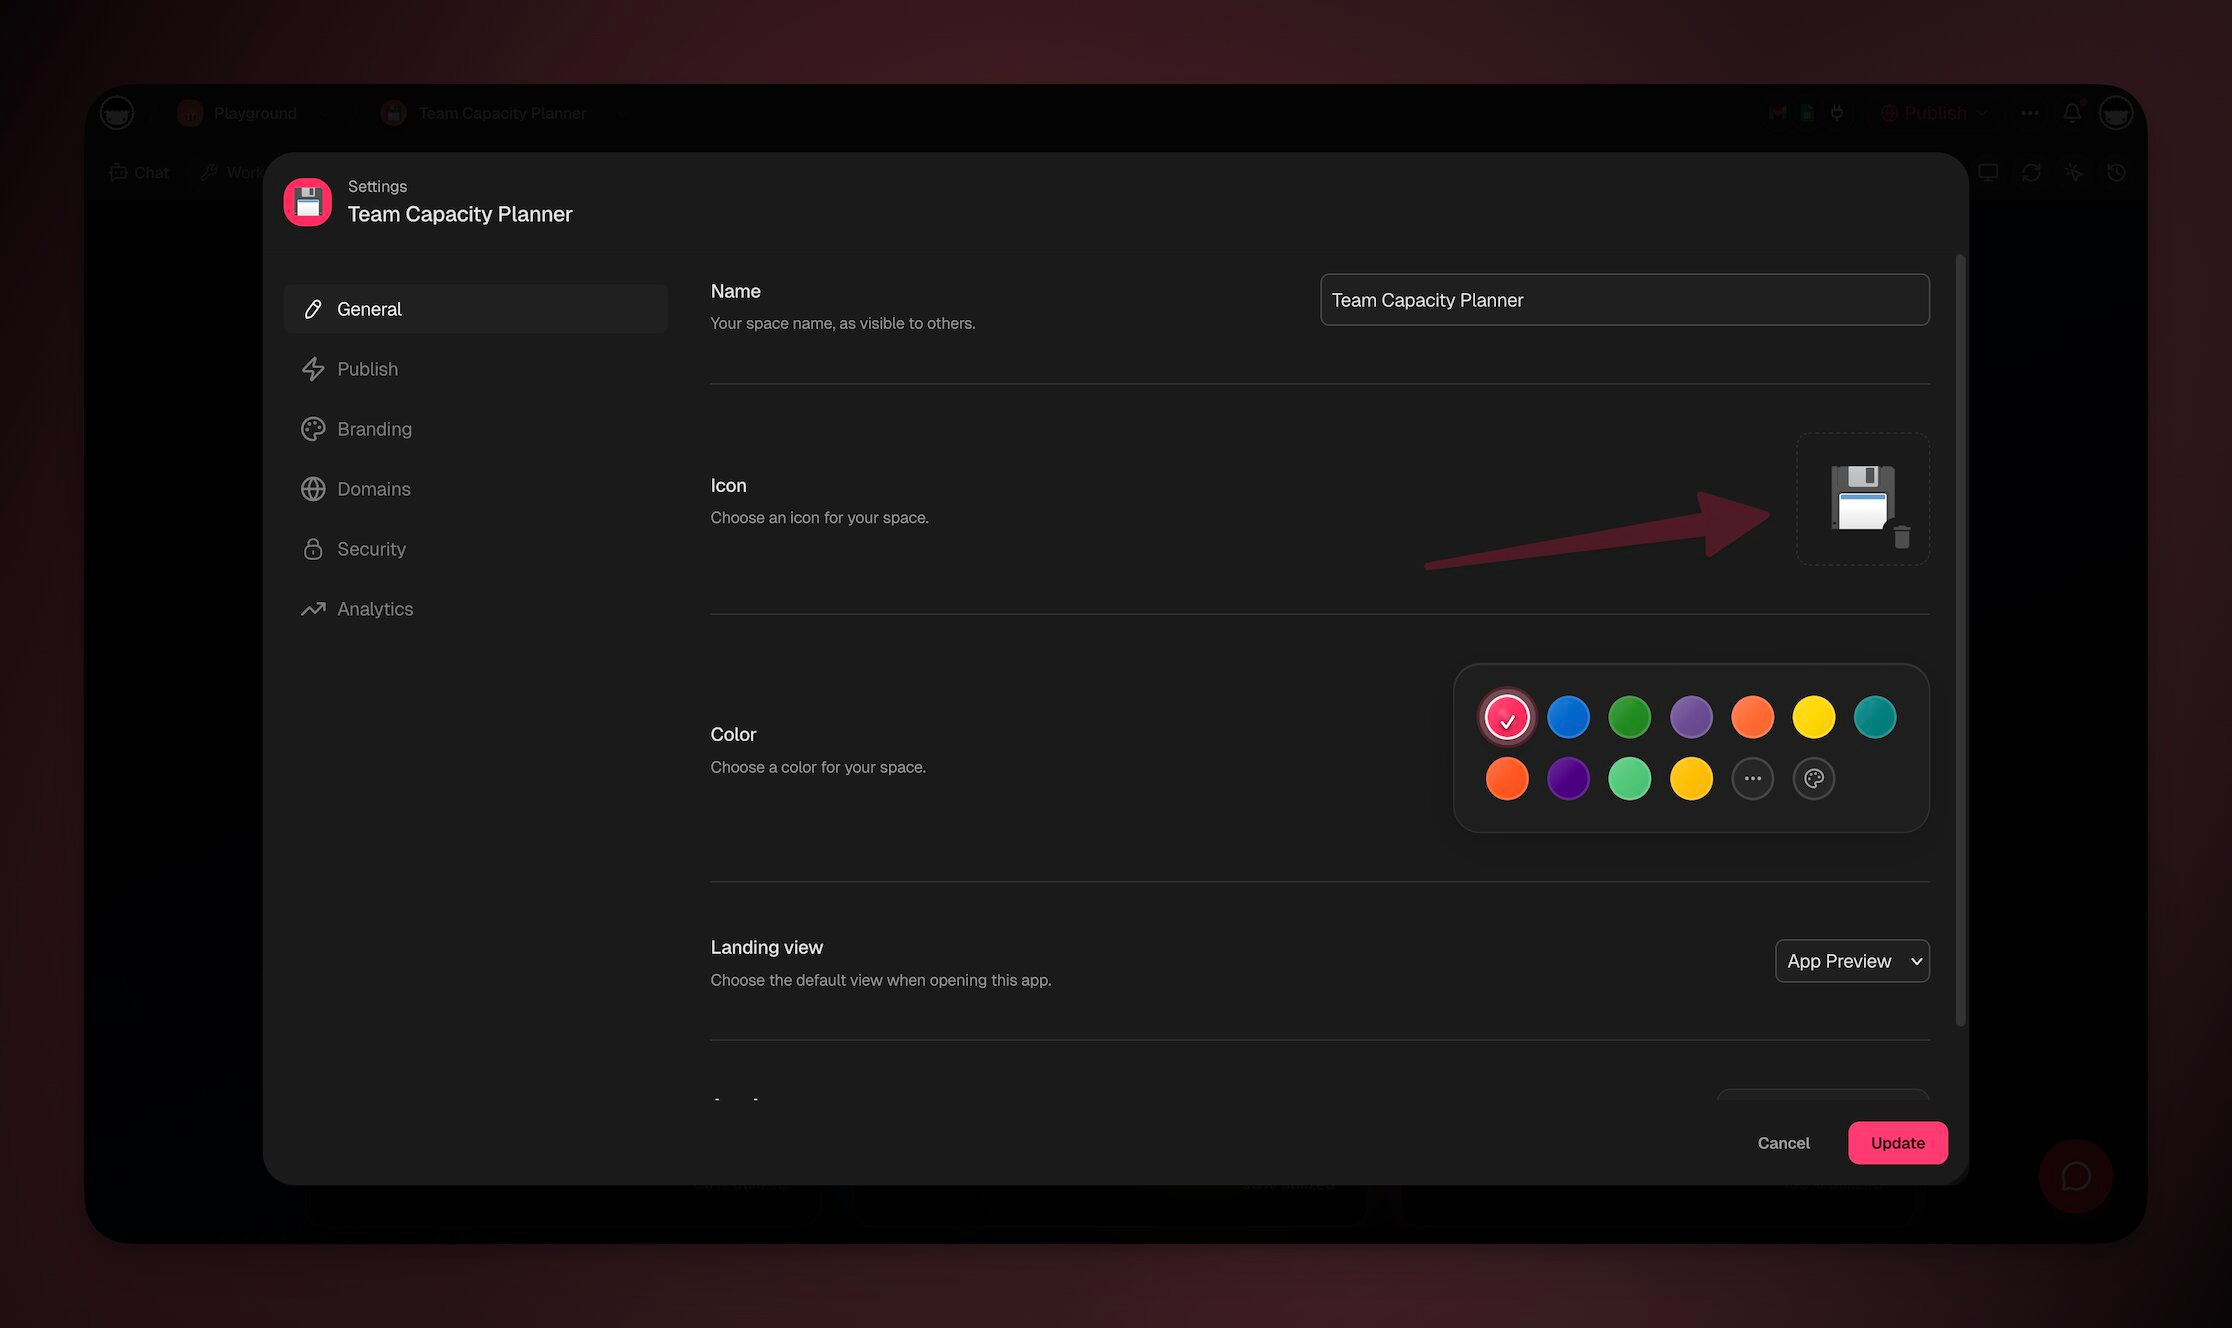
- Preview your favicon in a browser tab.
💡 Note: We recommend 32×32 or 64×64 PNG images.

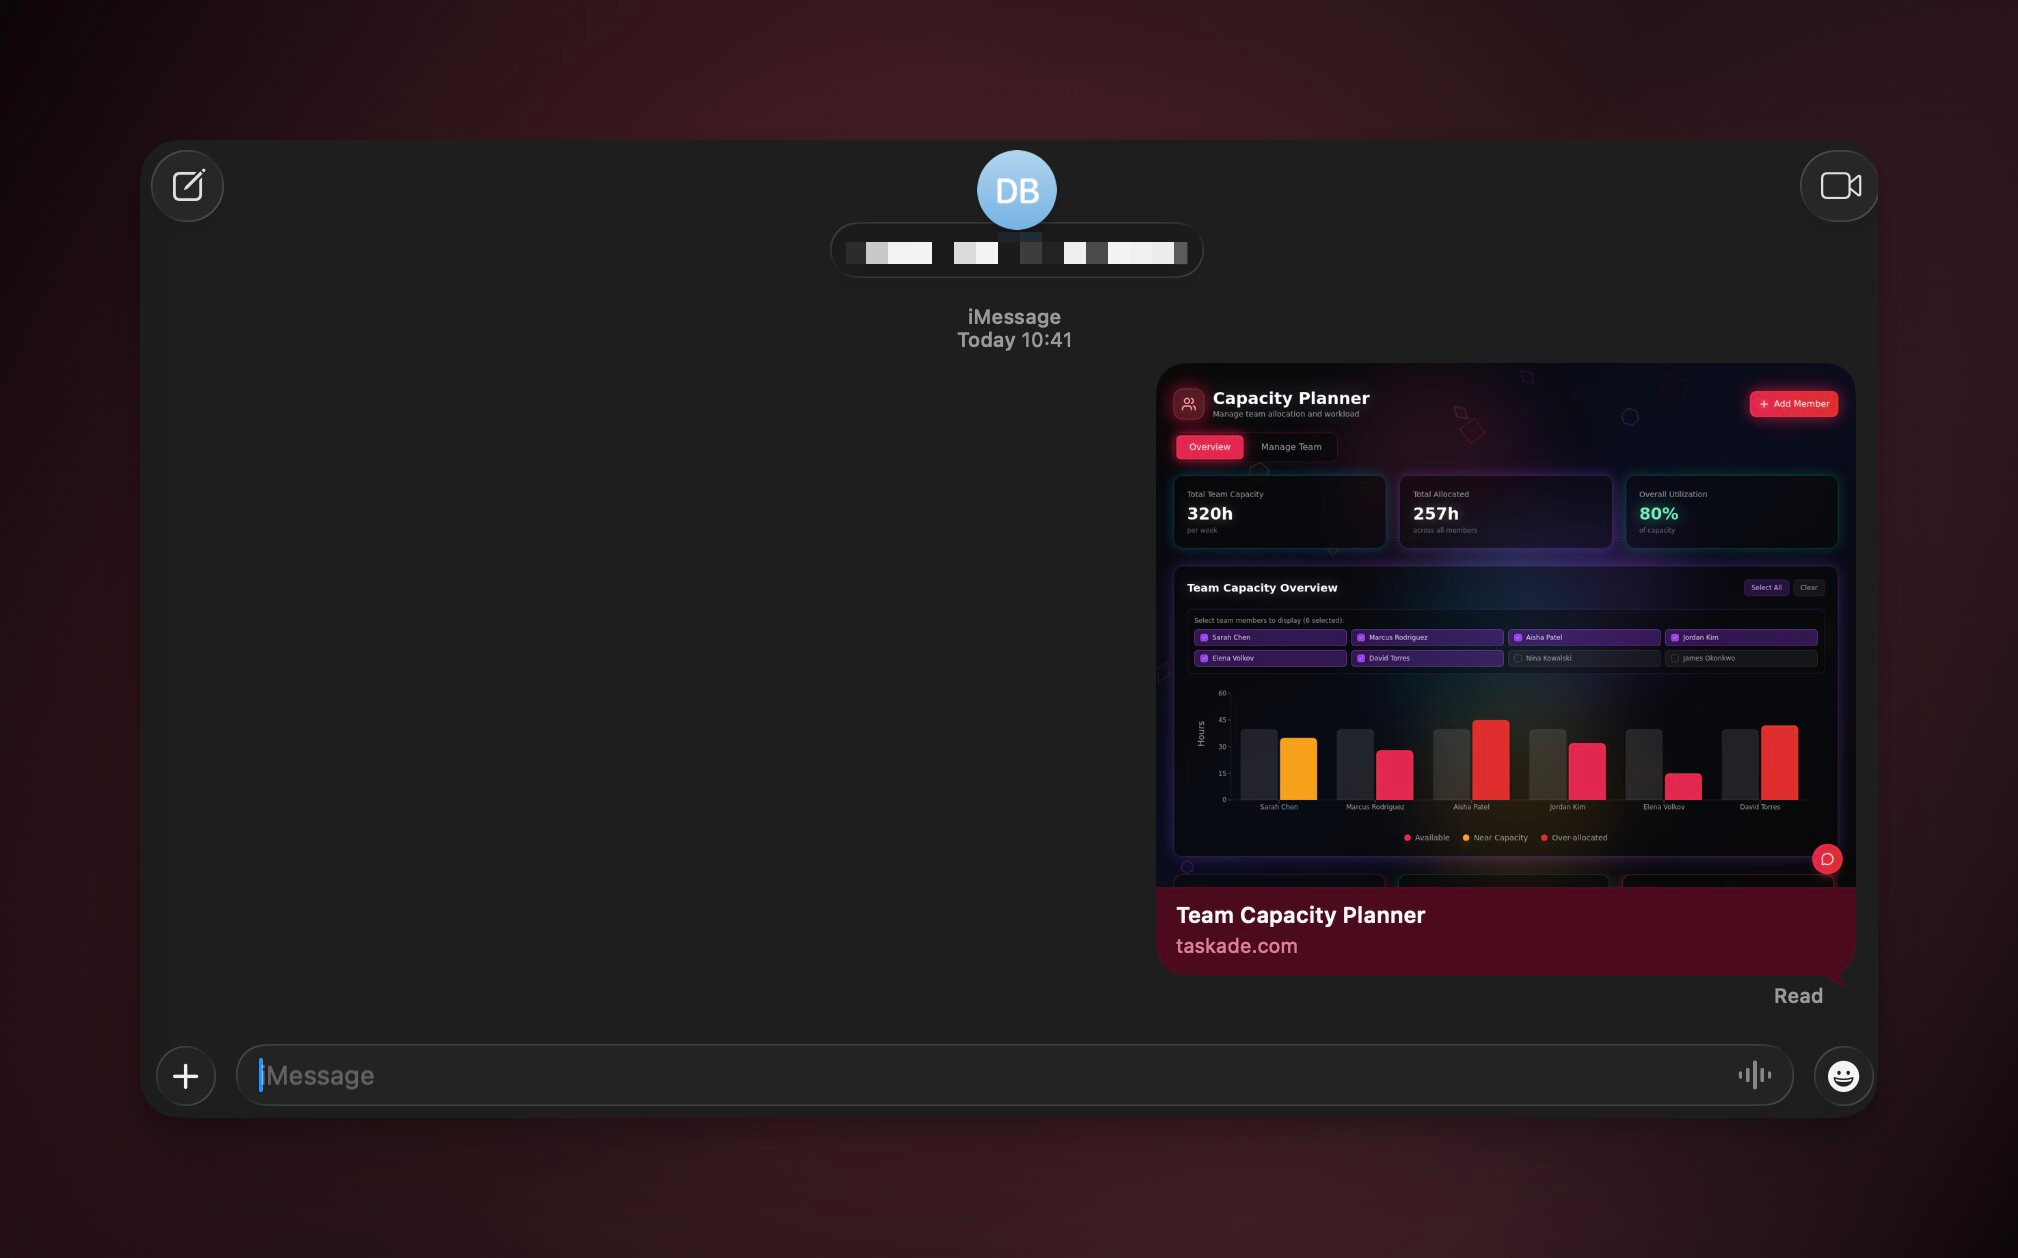
Open Graph Image
When your app is shared on social media, Slack, or Discord, Taskade automatically generates a screenshot of your app to use as the preview image.
App Analytics
Every Taskade Genesis app includes a powerful analytics dashboard.
Note: Visit App Analytics to learn more.
- Open your published Taskade Genesis app.
- Click App Settings (gear icon).
- Click Analytics in the settings menu
Security Considerations
- Only publish apps that don't contain sensitive information.
- Use private links for internal or confidential applications.
- Remember that public apps can be discovered by anyone.
- Template links share your entire workflow structure.
Frequently Asked Questions
How do I publish my Taskade Genesis app?
Open your app, then click the Publish button in the top-right corner. Pick a visibility (Private, Secret, or Public) and click Publish. Your app moves from Draft to Preview to Published, and you get a live URL with automatic SSL that works on any device.
Who can see my published app?
It depends on the visibility you choose. A Public app is visible to everyone and discoverable in search and the Community Gallery. A Secret app is hidden from search and only opens for people who have the private link. A Private app stays inside your workspace and is not accessible externally.
Can I publish my app to my own domain?
Yes. Open the Domains tab in the Publish panel to connect a domain you already own, manage your free Taskade domain, or buy a new one. Custom domains are available on the Business plan and up. See Custom Domains for the full setup.
Can I password-protect an app?
Yes. In the Publish panel, toggle Require Password, set a password, and click Update Password to save it. Visitors enter the password before they reach your app. You can change or remove it anytime from the Publish panel or under Settings → Security.
What is the difference between Draft, Preview, and Published?
Draft is your private work in progress in the builder. Preview lets you test the app as a real user would experience it before going live. Published makes it live software with a shareable URL. The lifecycle is reversible, so you can edit, re-publish, or unpublish at any time.
Can people clone or embed my published app?
Yes. If you enable cloning, others can open your app, click Edit in Taskade, and then Clone it into their own workspace as a complete copy. You can also embed the app elsewhere using the embed code from the Publish panel, so it runs inside another site.
Related guides
- App Users. Give clients and teammates their own login to your published app.
- Single Sign-On for Apps. Let people sign in with an account they already have.
- Custom Domains. Put your published app on your own branded domain.
- Community Gallery. Discover and clone 150,000+ community apps.
- App Analytics. See who visits and uses your published app.
- Genesis App URLs: Spaces, Projects, Automations. Pick the right link to share, embed, or bookmark.