
Overview
You want a customer list that runs itself. A solo realtor wants every web-form inquiry to land in one pipeline, get scored, and trigger a same-day reply. A field-service business wants every customer and every job tracked in one place, with reminders that fire on their own. Taskade Genesis builds that CRM from a single prompt. No code. No spreadsheets. No per-seat tax.
Under the hood, a Taskade Genesis CRM runs on the four layers of Workspace DNA. Projects (Memory) hold your accounts, contacts, and deals. AI agents (Intelligence) score leads and draft follow-ups. Automations (Execution) route hot leads and log every activity. And the App UI (Interface) is a Table view, or a published Taskade Genesis dashboard your team actually uses.
TL;DR: Describe your CRM in one sentence and Taskade Genesis builds a working pipeline: a contacts table, AI lead scoring, automated follow-ups across Gmail, Slack, and Calendly, and a published dashboard. A solo realtor turns a contact form into an inbound pipeline. A field-service crew tracks customers and jobs in one place. Starts at $6/mo with 100+ integrations included. Build a CRM →
Powered by Taskade Genesis. Taskade Genesis lets you build a complete CRM dashboard with AI lead scoring, pipeline management, and automated follow-ups, connected to HubSpot, Shopify, and Stripe. Build your own custom app in minutes with Taskade Genesis, the AI-powered app builder that creates full-stack applications from a single prompt.
- 🔶 Track client interactions
- 🔶 Manage sales pipelines
- 🔶 Automate leads nurturing
Note: Read the Table View article to learn more.
Clone these live apps
Want a head start? These are real, working Taskade Genesis apps. Open the demo, see how the pipeline and dashboard fit together, then clone it into your own workspace and rename the fields. No setup required.
| App | What it does | Best for | Preview |
|---|---|---|---|
| Neon CRM Dashboard | A full sales pipeline with deal stages, contact records, and a live dashboard view. | A solo realtor running an inbound pipeline from a contact form. | Open demo → |
| Client Portal Dashboard | A shared client view that tracks customers, jobs, and status in one clean interface. | A field-service business tracking customers and jobs. | Open demo → |
Cloning copies the whole app: the table structure, the views, and the layout. You keep what fits and change the rest in plain English. Browse more in the Community Gallery.
How a Taskade Genesis CRM runs itself
A CRM is only useful when it updates without you. Here is the loop. A lead arrives, an AI agent qualifies it, an automation books the meeting and writes the record, and your dashboard refreshes on its own. This is the Workspace DNA loop in action: Memory feeds Intelligence, Intelligence triggers Execution, and Execution writes back to Memory.
Each outcome maps to one layer of Workspace DNA. Here is who does what.
| Outcome you want | Workspace DNA layer | What handles it |
|---|---|---|
| Keep every contact and deal in one place | Memory | A Project in Table view |
| Score leads and draft replies | Intelligence | An AI agent (Taskade EVE wires it up) |
| Route hot leads and book meetings | Execution | Automations across Gmail, Slack, Calendly |
| Give your team a screen they actually use | Interface | A published Taskade Genesis dashboard |
Build a CRM from scratch (no code, no spreadsheets)
Taskade Genesis builds a working CRM from a single prompt. You get a pipeline Table, AI lead scoring, automated follow-ups across Gmail, Slack, and Calendly, and a published dashboard your sales team uses every day. No code, no spreadsheets, no per-seat tax. The Project is the database. Taskade EVE writes the follow-ups. Automations move the deals.
To get started, open Taskade Genesis and paste a prompt like:
Build a sales CRM.
Pipeline stages: New, Qualified, Proposal, Closed Won, Closed Lost.
Fields per deal: company, contact, value, owner, next_step, last_touched.
Include AI lead scoring, an inbox for inbound leads from Gmail and Calendly,
auto-drafted follow-up emails after every meeting, and a dashboard showing
deals by stage, deals by owner, and revenue forecast.
Taskade Genesis ships a pipeline Project, a published dashboard, an inbound automation, and Taskade EVE wired to score leads and draft replies. Tune the stages, invite your team, and route the link to sales.
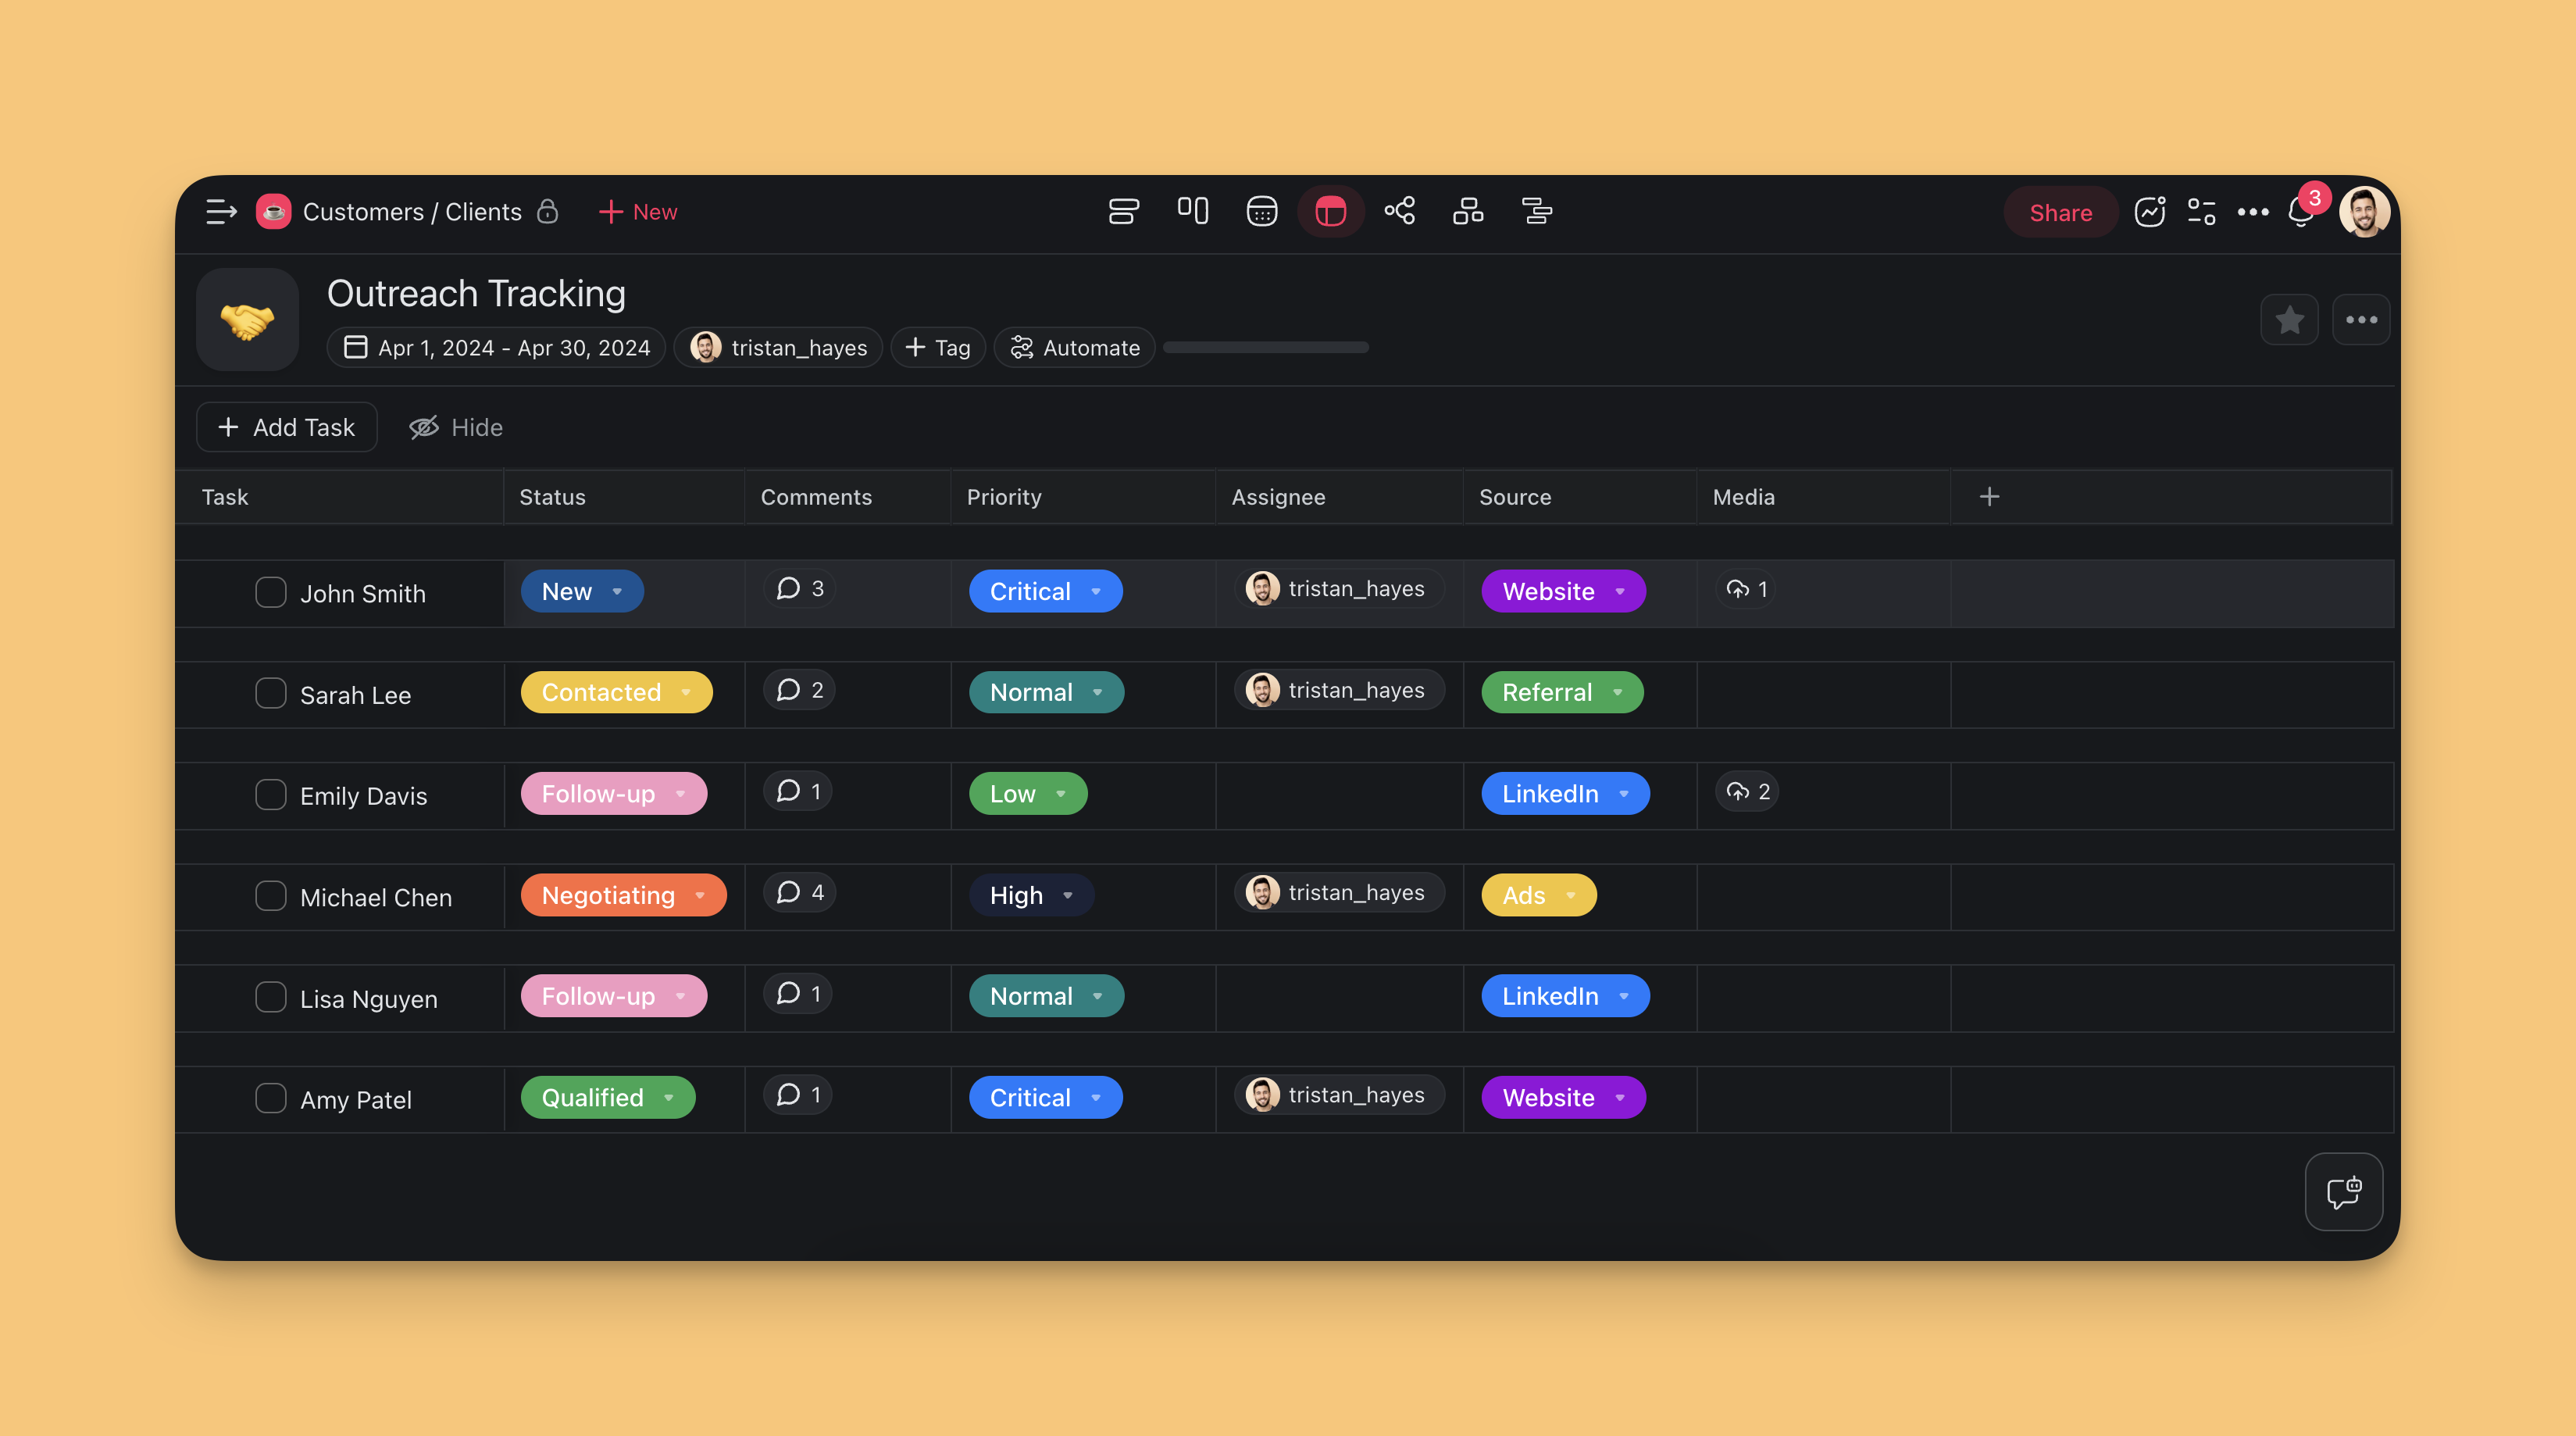
Getting Started with Table View
The Table view introduces adjustable columns tailored to your project's needs and lets you resize, rearrange, and modify visibility for a personalized CRM experience.
Enable the table view:
To build your CRM, start by switching to the Table view:
- Open your project.
- Click the 4th icon in the navigation bar at the top.
- Select the table view again to set the view as default.

Note: Changing project views doesn't affect project contents.
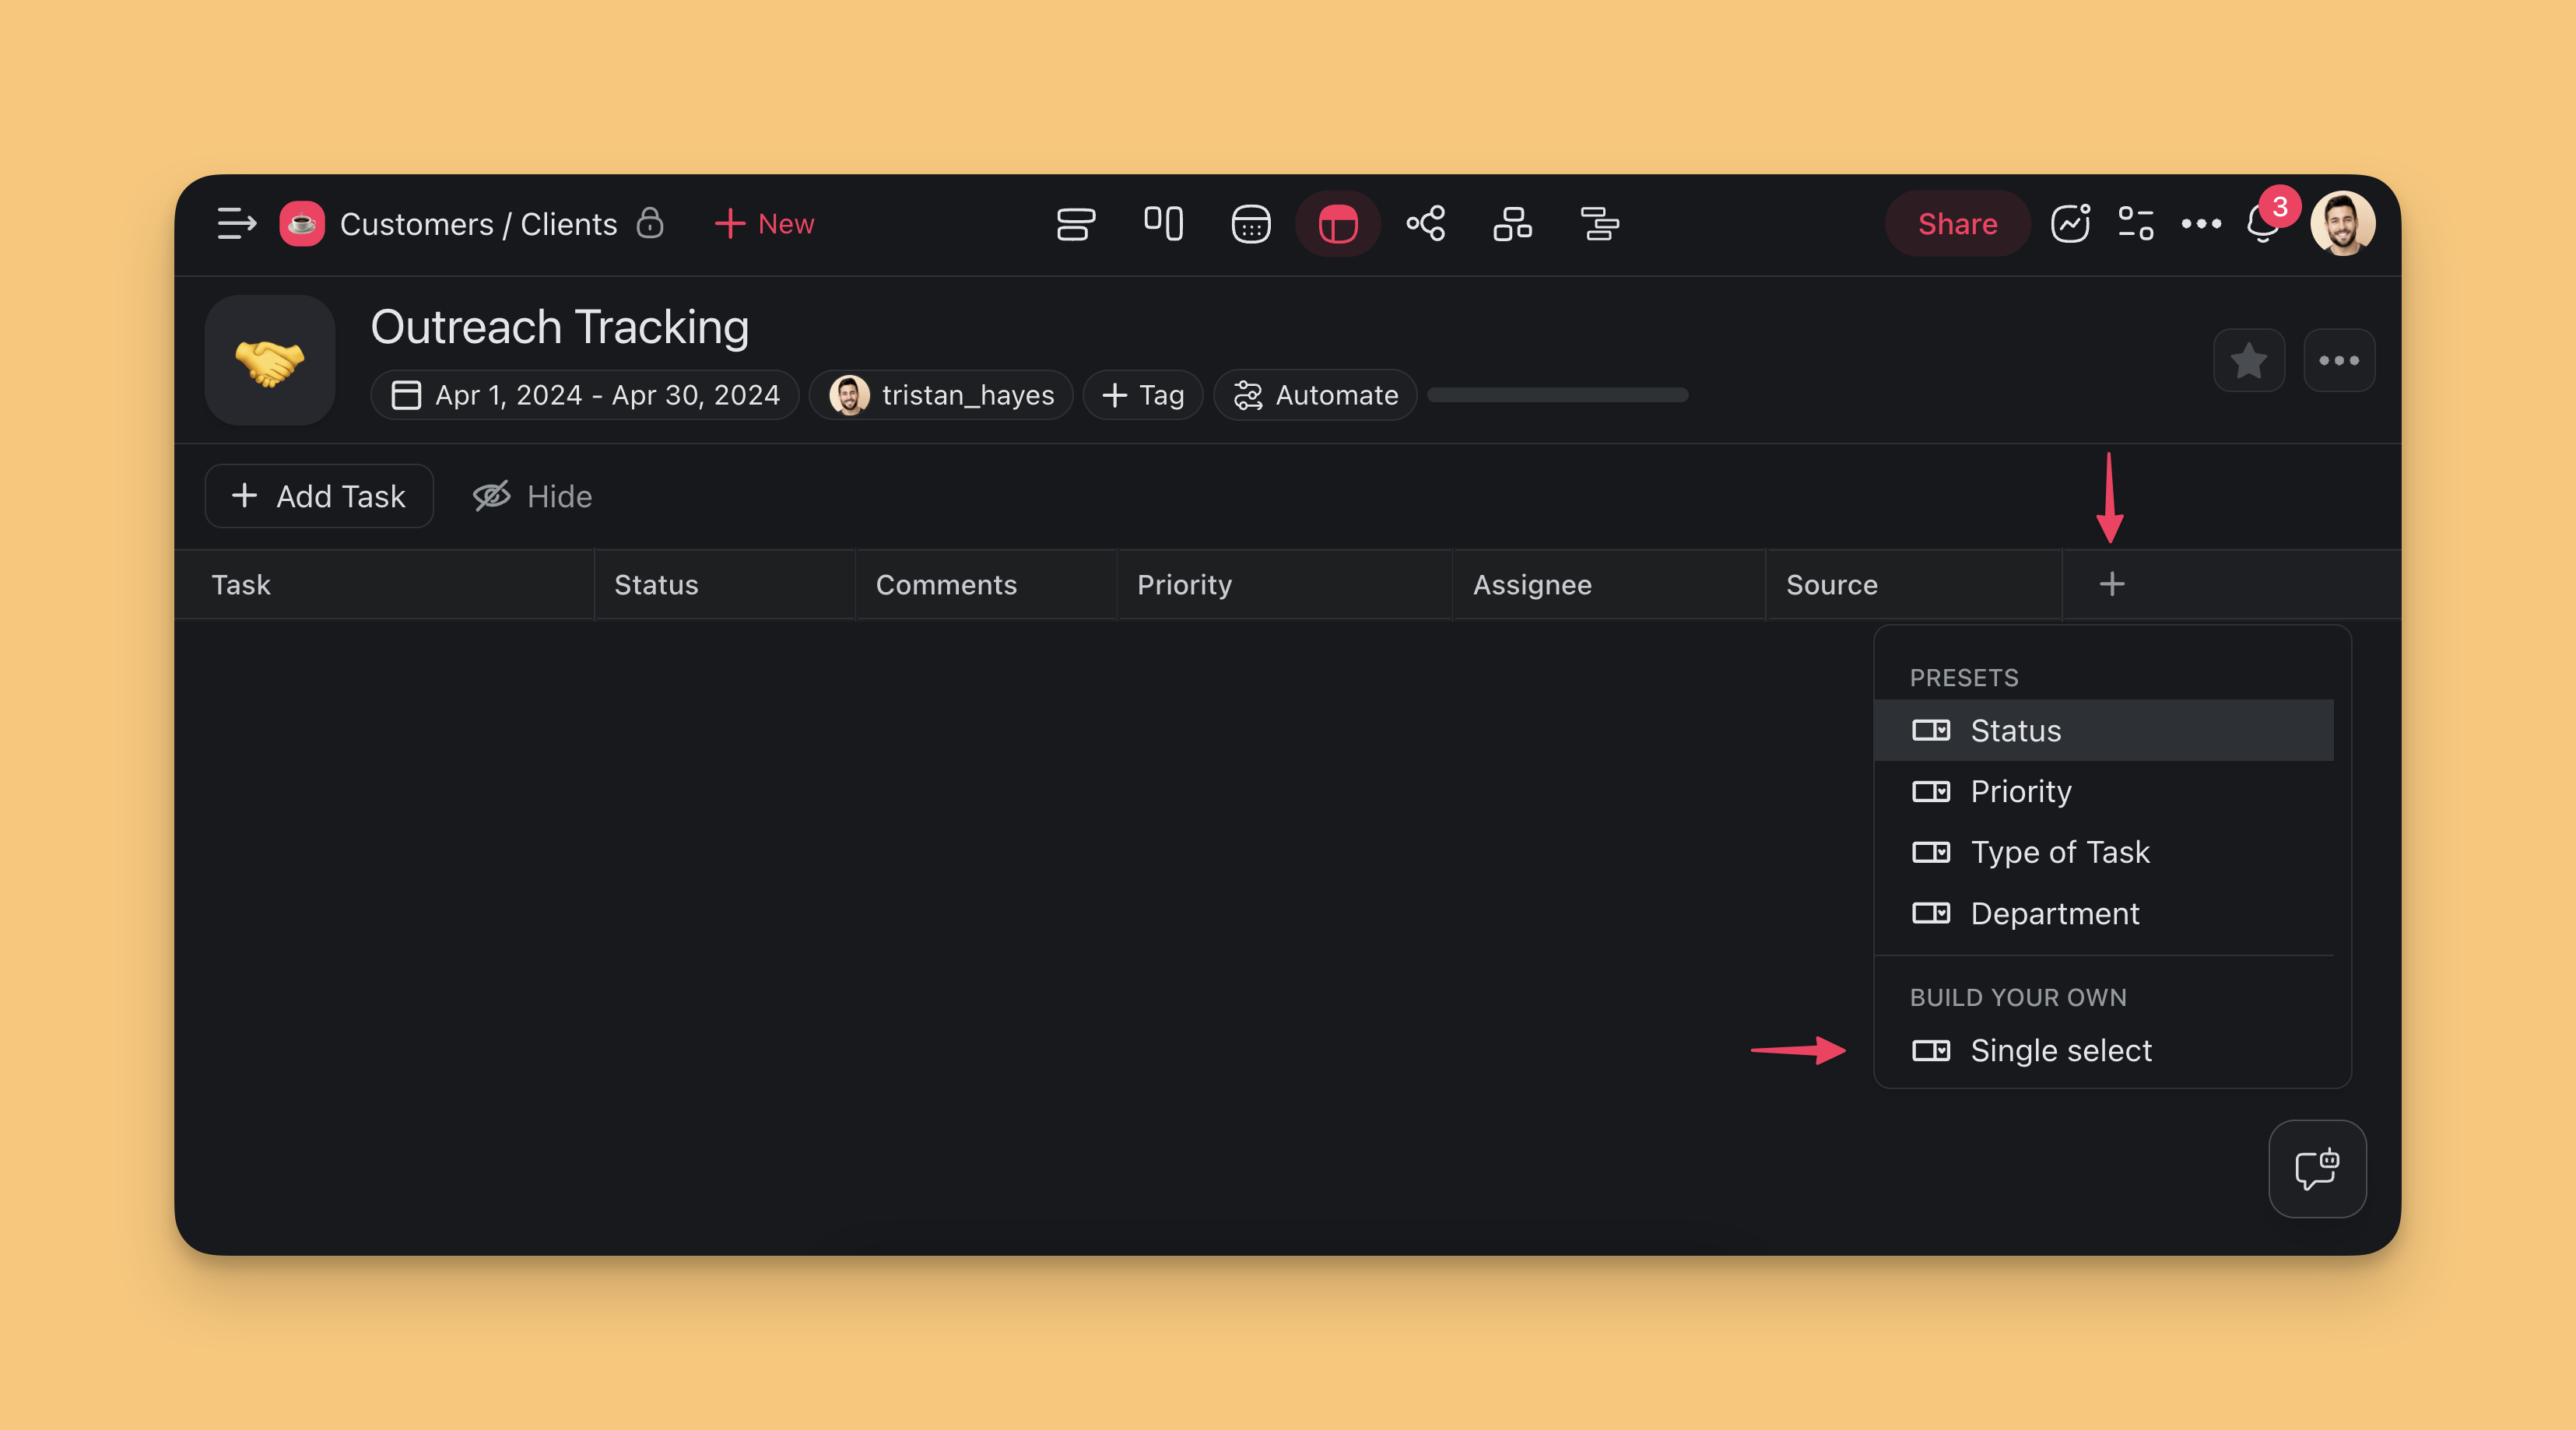
Add CRM Columns
Next, we need to add columns that will help you segment and sort your CRM information in a way that's tailored to your workflow.
Click the ➕ button next to the last column (you may need to scroll right).
(method #1) Choose one of the available presets.
(method #2) Choose Single select to add a custom column.
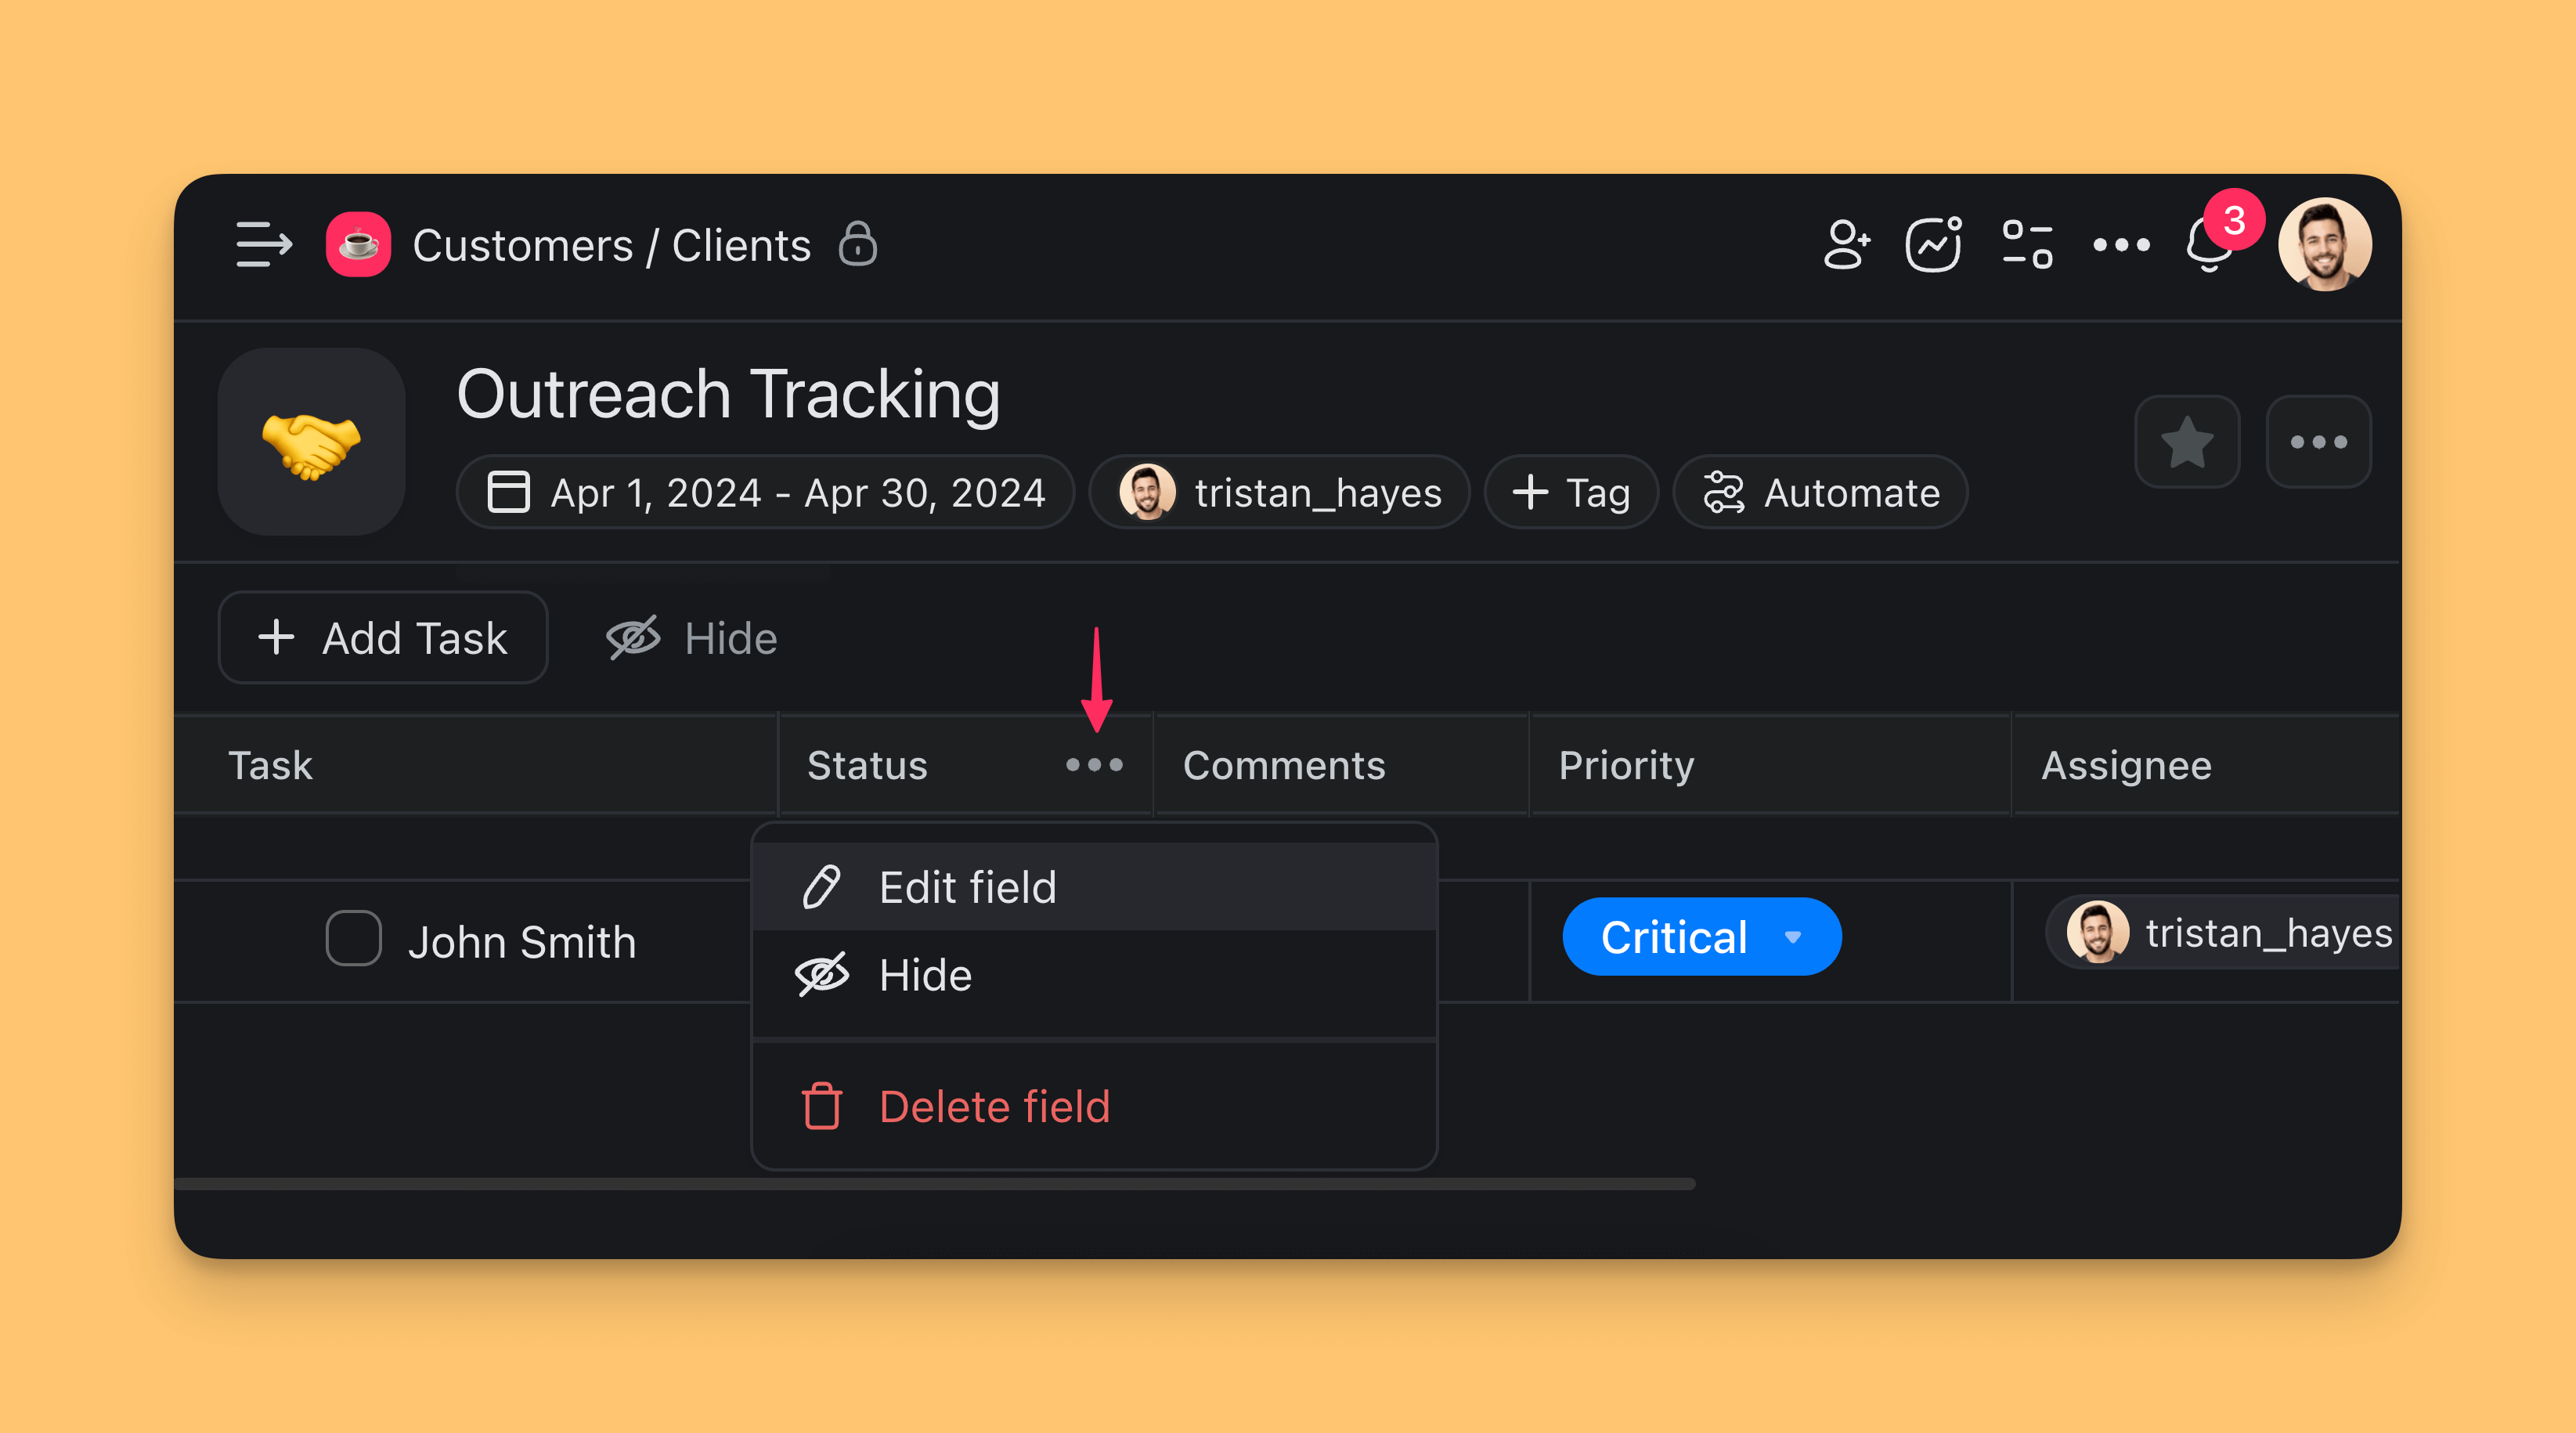
Edit Columns / Fields
You can customize existing CRM fields at any time:
Edit field contents:
Click the ··· three dots next to a column name.
Choose ✏️ Edit Field from the list.
Edit the field name and available options.
Resize, reorder, or hide columns:
Resize: Click and hold a column divider and drag it to the left or right.
Reorder: Click and hold a column header and drag it to the left or right.
Hide: Click ··· next to a column header ➡ Hide column.
Show: Click the ➕ button at the end of a table to add columns again.
You may need to scroll to the right to see the ➕ button.
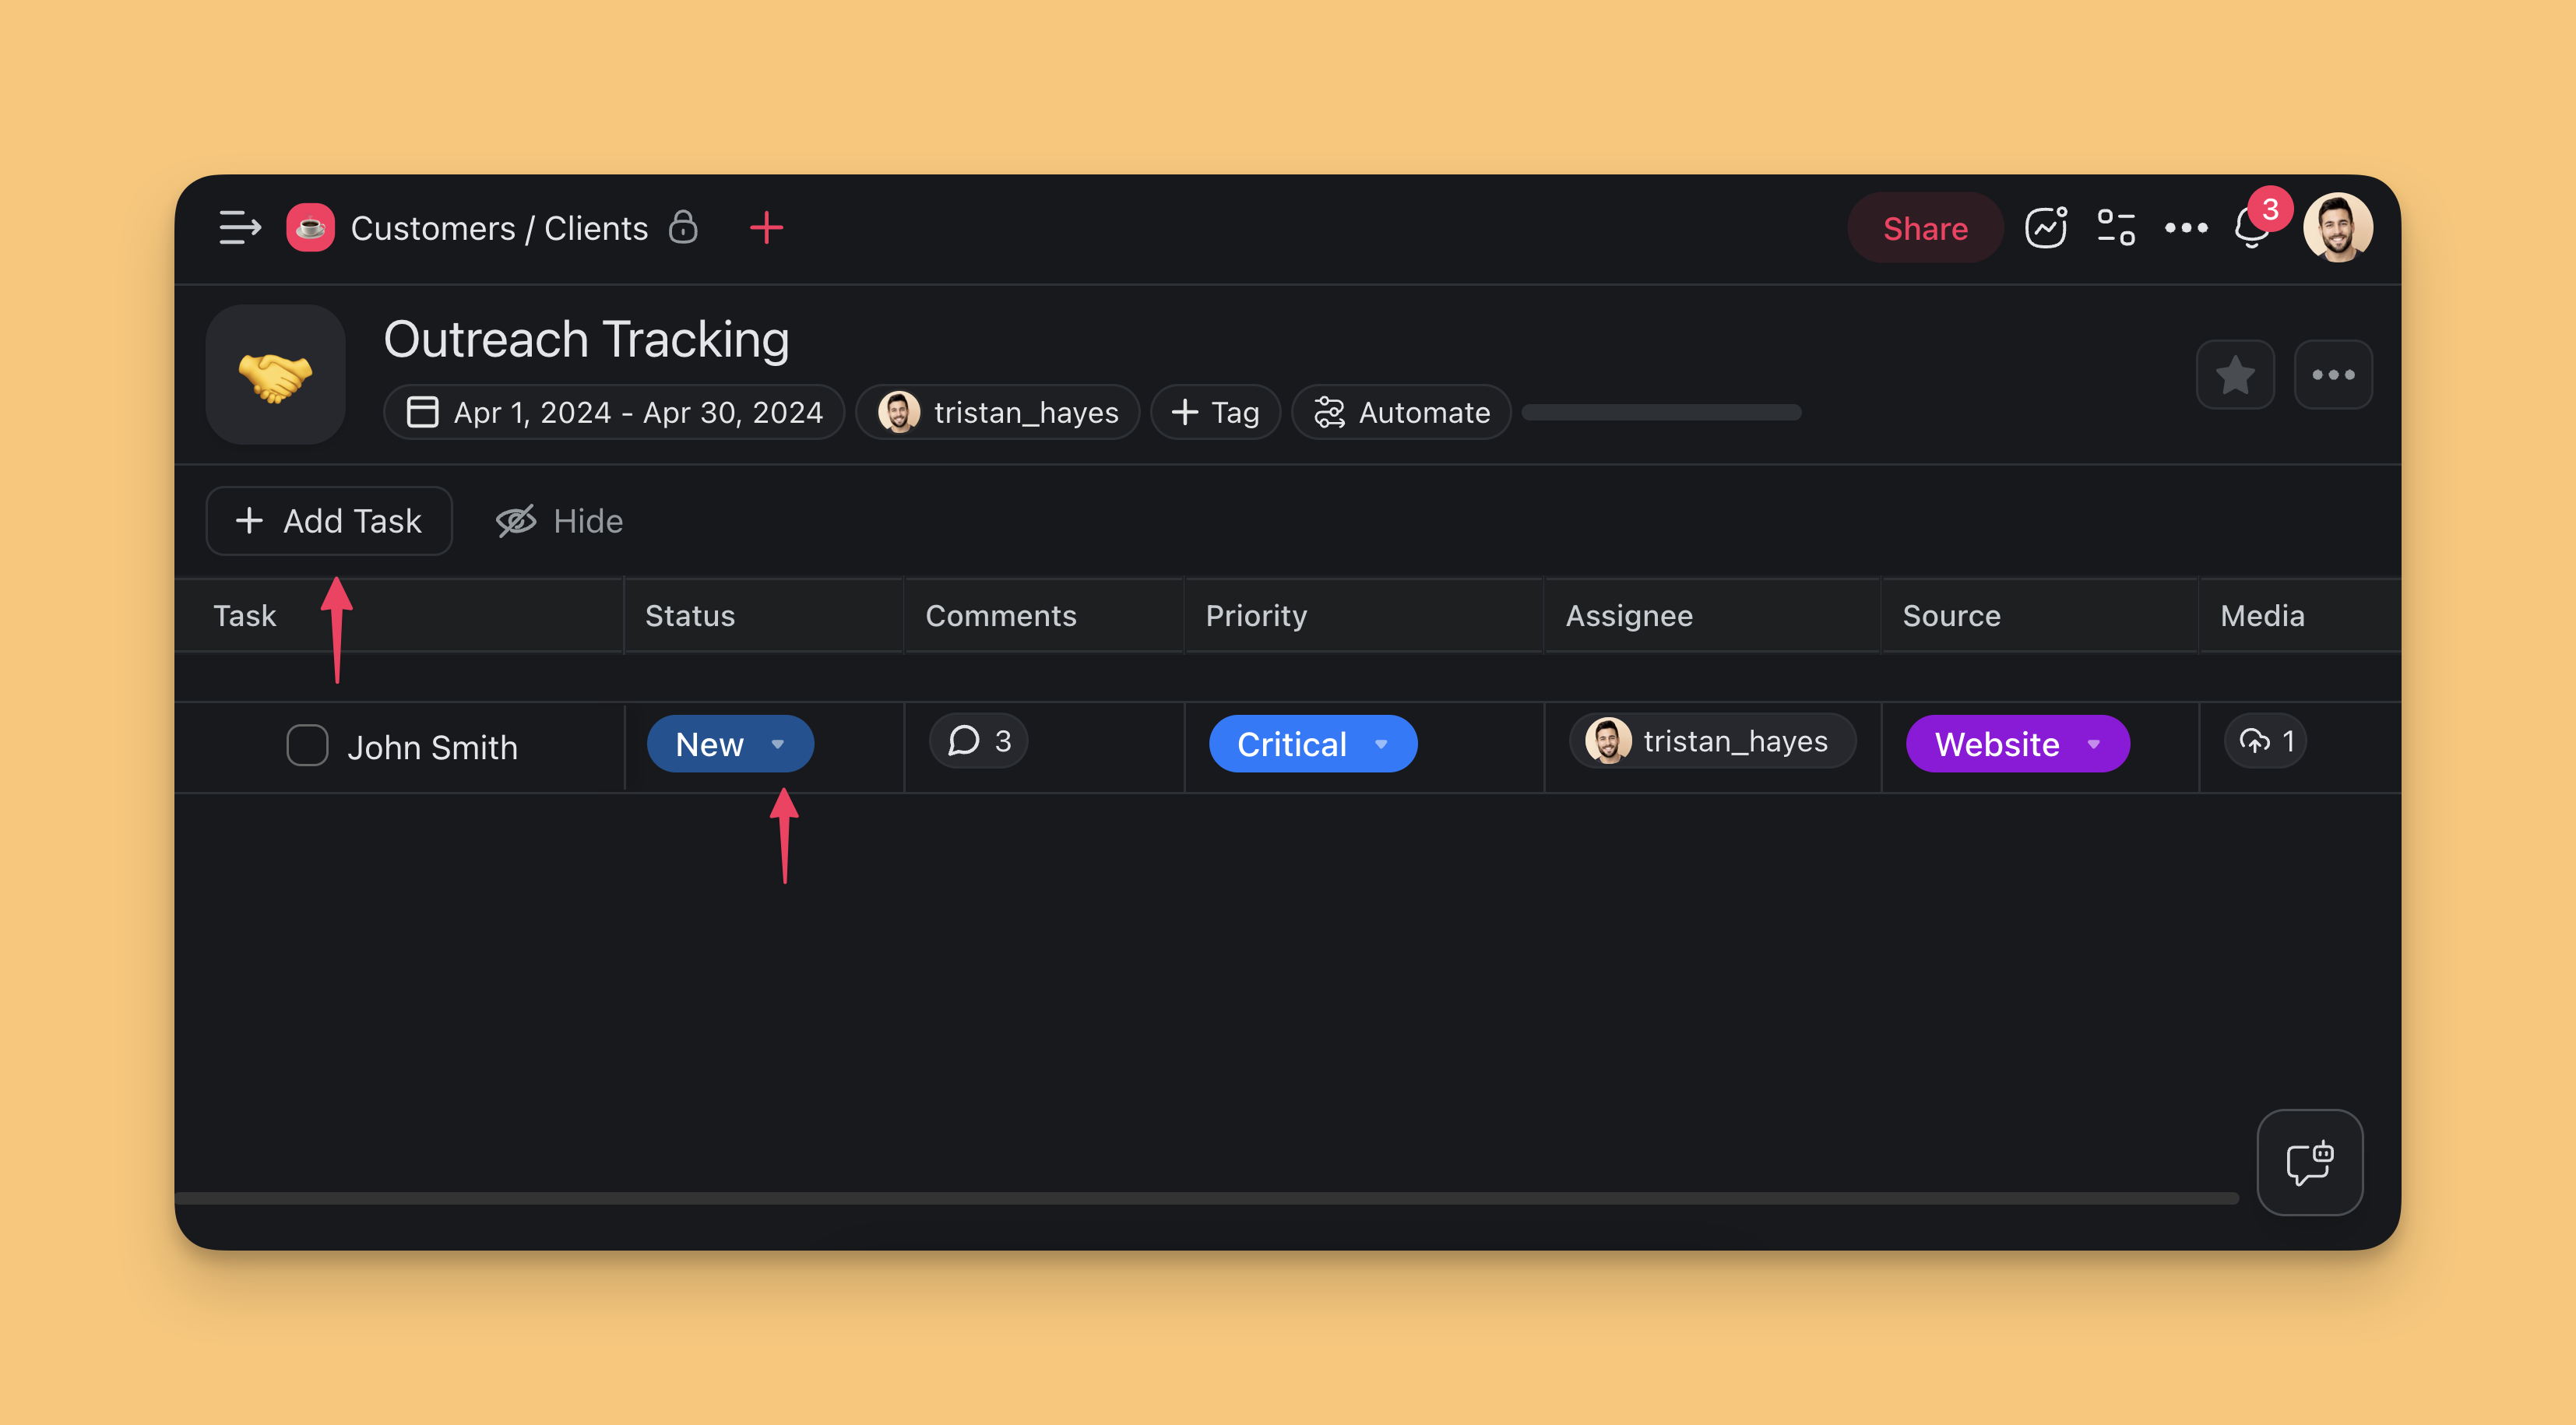
Add CRM Entries
Now that we've laid the groundwork with our neatly arranged columns, it's time to bring our CRM to life by adding entries. This is where the magic happens – each entry represents a valuable interaction, a client, or a lead that helps your business thrive.
- Click the ➕ Add Task button at the top of the table.
- Type the name or title on the left.
- Use the column drop-downs to select item parameters.
Automate Your CRM with Taskade AI
Taskade lets you connect to essential tools like Mailchimp, Google Sheets, Google Forms, or Gmail to automate your CRM workflow.
💡 Note: Visit Triggers & Actions for a full list of available connectors.
Go to the Automations tab in your workspace
Click ➕ Add automation.
Click ➕ Add Trigger to choose a trigger.
Click ➕ Add Action to define automation steps.
When you're done, click Save changes in the top-right corner.
Note: Watch this short video to get started! 👇
Automation Ideas
You can automate and streamline your CRM projects in many different ways. Here are a few CRM automation ideas to get you started.
Google Forms + Taskade AI + Gmail
| Google Forms | Trigger: New Form Submission |
|---|---|
| Taskade | Action: Add Task |
| Taskade AI | Action: Generate with AI |
| Gmail | Action: Send email |
🔄 Automation Scenario: When a new form submission is received from a potential lead through Google Forms, the lead is added to the CRM project. Taskade AI generates a personalized message based on the submitted information. Gmail then automatically sends this message to the lead.
Calendly + Taskade AI + Slack
| Calendly | Trigger: Event Scheduled |
|---|---|
| Taskade | Action: Add Task |
| Taskade AI | Action: Generate with AI |
| Slack | Action: Send channel message |
🔄 Automation Scenario: When a new event is scheduled in Calendly, the lead is added to the CRM project. Taskade AI generates a personalized message or reminder based on the event details. This message is then sent to a designated Slack channel to notify team members about the scheduled event.
The CRM Data Model
Behind every sales workflow is a simple data model. In Taskade, each entity is a project . you don't set up tables manually:
Accounts contain contacts. Contacts drive deals. Deals sit in stages. Every call, email, and note is an activity . and AI agents + automations are first-class writers of activities alongside humans. That's what makes a Taskade CRM live: your pipeline updates itself as real-world events happen.
vs. $200/seat CRMs
| Traditional CRM | Taskade Genesis CRM |
|---|---|
| $75–$200/user/month (Salesforce, HubSpot) | Starts at $6/mo |
| Fixed schema, rigid custom fields | Edit your CRM in natural language any time |
| Reports you configure yourself | Ask an agent in plain English |
| Integrations = paid add-ons | 100+ integrations included |
| Email/SMS outreach = separate tool | Built-in via Automations |
| Data lives in their cloud | Lives in your Taskade workspace alongside projects, docs, and agents |
Frequently asked questions
Can a non-technical person build a CRM in Taskade Genesis?
Yes. You describe the CRM you want in one plain-English sentence and Taskade Genesis builds the pipeline table, the dashboard, and the automations for you. There is no code and no spreadsheet setup. A solo realtor or a field-service owner can ship a working CRM in minutes, then adjust fields and stages by typing what they want changed.
How does a solo realtor turn a contact form into a CRM?
Point your website contact form at Taskade through an automation. When someone submits the form, the lead lands in your pipeline as a new record. An AI agent scores it, and an automation drafts a same-day reply through Gmail. Your dashboard updates on its own, so you always see who is new, who is hot, and who needs a follow-up.
Can a field-service business track both customers and jobs here?
Yes. Keep a customer record in one Table view and link each job to the customer it belongs to. Automations send reminders before a job, mark it complete after, and log the activity. The Client Portal Dashboard above is a ready-made starting point you can clone and rename for your trade.
Do I need to set up a database or tables by hand?
No. Each Project is the database. When you ask for accounts, contacts, and deals, Taskade Genesis creates the structure automatically. You never write a schema or connect a separate database. See Projects & Databases for how the Memory layer stores your data.
What does a Taskade Genesis CRM cost?
Paid plans start at Starter $6/mo, then Pro $16/mo, Business $40/mo, Max $200/mo, and Enterprise $400/mo. A traditional CRM like Salesforce or HubSpot runs $75 to $200 per user per month. Taskade Genesis includes 100+ integrations and AI agents at every paid tier, so outreach and automation are not separate add-ons.
Can my team use the CRM without learning Taskade first?
Yes. Publish your CRM as a Taskade Genesis dashboard and share the link. Your team sees a clean screen built for the way they work, not a stack of menus. They can add deals, update stages, and read the dashboard without touching the builder.
Related guides
- Your First Taskade Genesis App. Build any app, including a CRM, from one prompt
- Workspace DNA Explained. How Memory, Intelligence, and Execution work together
- Publish a Genesis App. Ship your CRM dashboard as a link your team uses
- Custom AI Agents. Train a sales agent on your ideal customer and playbook
- Projects & Databases. The Memory layer your CRM sits on
- Agent Action. Trigger your sales agent from any event
- HubSpot Integration. Sync with an existing HubSpot CRM
- Apollo Integration. Pull prospect data into your CRM
- Gmail Integration. Log email activity automatically
- Calendly Integration. Auto-create deals when meetings are booked
- Workflow Generator. Describe your sales process in English